Are you using AWS LightSail infrastructure to install WordPress and looking for ways of connecting to phpMyAdmin for managing your database? Here is an easy tutorial which will allow you to set it up on Windows, Mac or Linux machines.
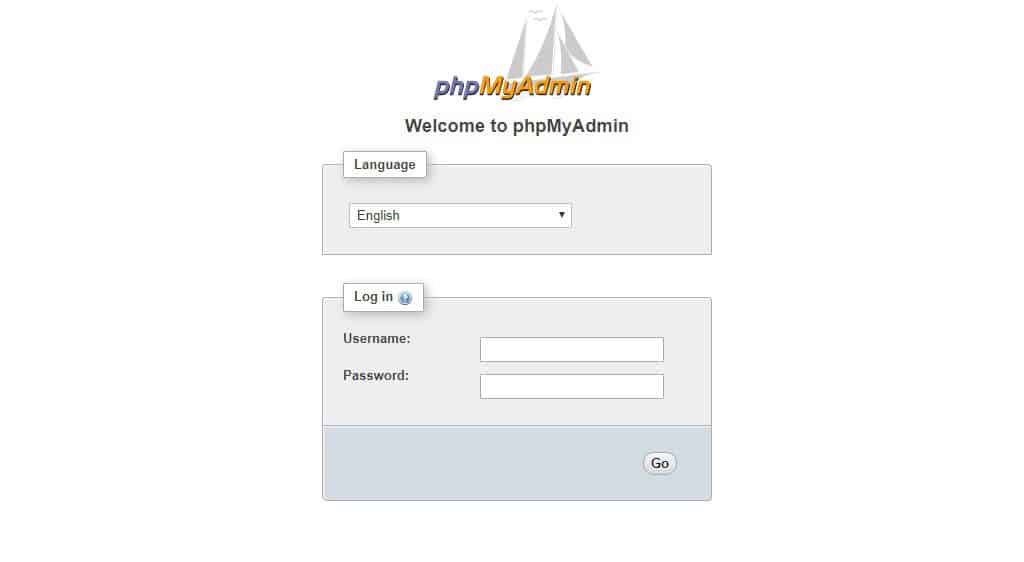
AWS LightSail is one of the best VPN hosting providers with the most affordable costs. They are backed by state of art AWS infrastructure which makes sure you get good up-time and service.
Once you install WordPress on AWS LightSail you need to set up some basic services. phpMyAdmin connection is one of those services which will make sure you can optimize and manage your WordPress database.
How To Connect phpMyAdmin on AWS LightSail
AWS LightSail uses a Bitnami WordPress image which is optimized for performance and security. It means you can’t just connect to your server and open phpMyAdmin. Also, it doesn’t come with a cPanel to provide additional tools to get your work done.
For security reasons, most of the admin tools are only accessible on the localhost IP address of 127.0.0.1 including phpMyAdmin.
As the address is a local address, you need to create a secure SSH tunnel which will allow you to access those tools.
What Is SSH Tunnel?
SSH tunnel is one of the ways to connect to services which are behind a firewall or with restricted access.
Bitnami restricts all the access to localhost only, which means they can only be accessed with local IP address. That address would be hostname 127.0.0.1, where you can access phpMyAdmin.
To connect to services like phpMyAdmin, you need to create an SSH tunnel between your local computer and AWS server. An SSH tunnel make sure that the communication between your machine and the server is encrypted and secure.
There are many security concerns over providing the direct access to the database so Bitnami hides the database with the help of SSH tunnel.
SSH Tunnel uses a port forwarding technique and forwards a local port to the remote connection. This way any local traffic going to that port will reach to that remote server and gets a result back.
So let’s check how you can create an SSH tunnel and access phpMyAdmin on AWS LightSail server.
Connect phpMyAdmin on Windows
You can use any SSH client on Windows to create an SSH tunnel. I prefer Putty as my preferred SSH client for Windows so we will use it in this tutorial.
Putty is a free SSH client and you can download it for free from Putty.org. You can go ahead and download the Windows version to access phpMyAdmin.
Once you have the Putty installed on the Windows machine, you need to create a secure connection and tunnel to your AWS server.
Create SSH Tunnel
You need to add the user id, SSH key and Port information to create an SSH Tunnel. The first thing which you will need to create a secure connection is your private key. You can download it from the account page in Amazon LightSail.
Make sure you download the key from the same region where your server is present. You will get a PEM keyfile from the account page but Putty does not work with it. It needs a PPK keyfile which can be generated with the help of PuttyGen.
PuttyGen is a tool which comes with Putty install. Just search and open the PuttyGen application to convert your PEM keyfile.
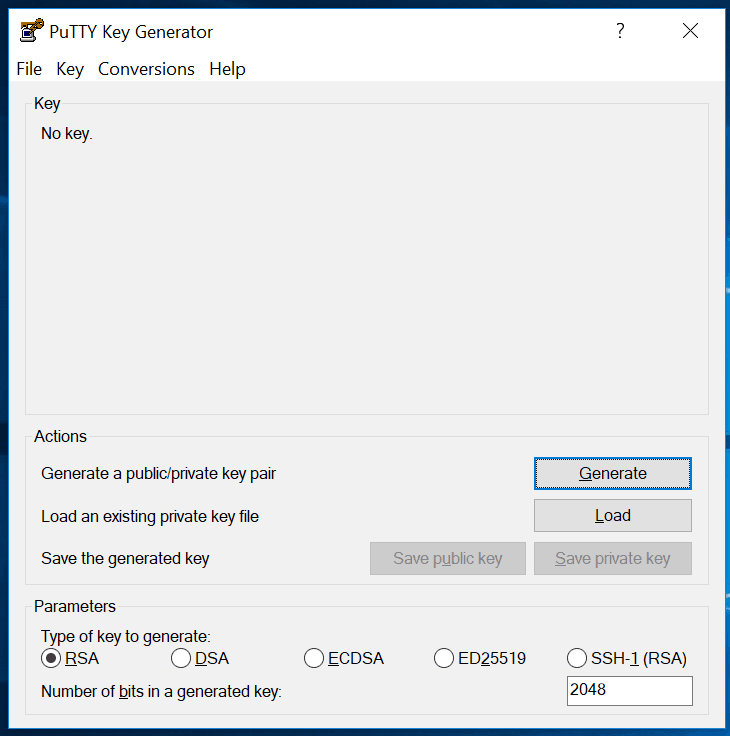
You can click on load and select the downloaded PEM keyfile. By default it will look for PPK file, so change the file type to all and select the PEM keyfile.
Once the key is loaded, just click on Save Private Key and save the PPK file. This will be the key which we will use while defining the connection for the AWS server.
Suggested Read: [Review] Designrr eBook Creator for Professionally Designed eBooks
Connect Putty To AWS Server
Now you can open Putty application and define the connection parameters for the AWS server. Just make sure to use the PPK file for your private key for the connection.
STEP 1: Open a new connection and enter the IP address of the AWS Server IP Address at Session screen.
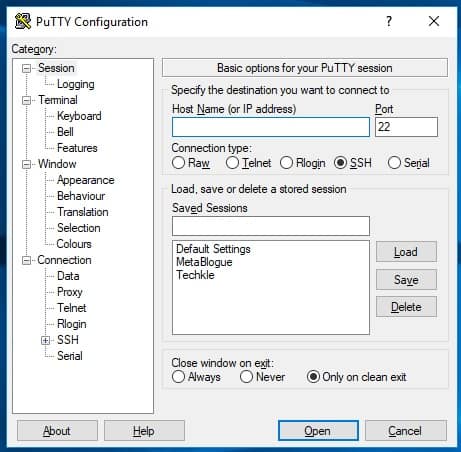
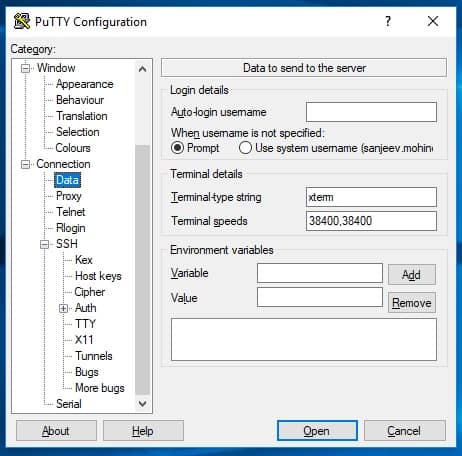
STEP 2: Now you need to enter the user id and private key in the Connection section. As we are going to create a SSH connection, we need to enter Username, Private key and Port Information in the Connection settings. All three things will go in different screens.
Click on Data tab under Connection settings and enter Username ‘bitnami’ in Auto-Login username field.
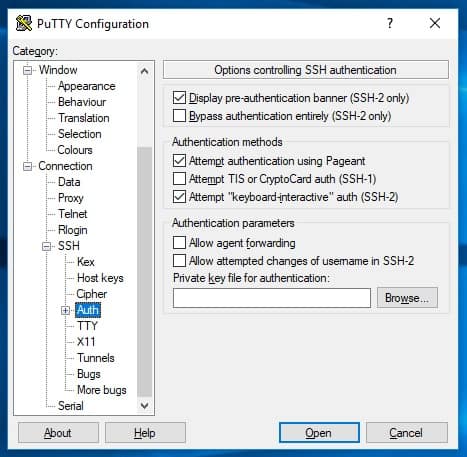
STEP 3: Now open Auth section and enter the path for the private key (PPK file).
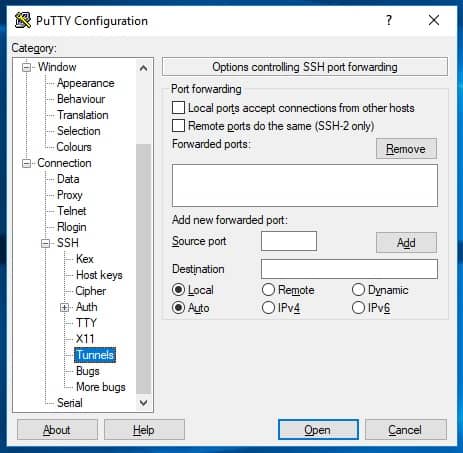
STEP 4: Open Tunnels section and enter the below values for the port fields.
Source Port: 8888
Destination: localhost:80
If you have enabled the SSL by following our guide, please change the destination port from 80 to 443. Once done, click on add to save the port information.
STEP 5: Now Go back to Session screen and enter a name for the session. Click on Save to save the settings, so each time you can just load the session to connect to your AWS Server.
Once done, click on connect and you will see a Bitnami welcome screen. If you see a popup before that, just click on Yes and it will take you to Bitnami welcome screen.
This means, you have connected to AWS Server and a tunnel has been established. Now go to below URL and access PHPMyAdmin.
http://127.0.0.1:8888/phpmyadmin/
If you have SSL enabled change HTTP to HTTPS in above URL.
Suggested Read: Best Third Party Premium Plugin for Divi Visual Page Builder From Elegant Themes
Connect phpMyAdmin on MacOS and Linux
Mac and Linux / Ubuntu come with the SSH utility which you can use to access the phpMyAdmin. You can access the SSH utility through the terminal application in the Mac.
You will need your private key to be able to log on to your AWS LightSail server. So go ahead and download the key from your account page. Once you have the key, you can change the current directory to the place where you have the key.
Now, enter the below command to enable the SSH tunnel between your machine and AWS LightSail server.
Just replace location_to_private_key and AWS_SERVER_IP_ADDRESS to the actual values and you will have an SSH tunnel created to your WordPress installation.
Now you can access the phpMyAdmin on the below mention URL:
http://127.0.0.1:8888/phpmyadmin/
Make sure that the port number in the URL and the SSH tunnel command is same.
If you have followed our guide to enable the SSL certificate on AWS WordPress, you will receive an error that secure connection can’t be established to phpMyAdmin.
This is because all the incoming traffic is getting transferred to SSL port and we have created an SSH tunnel on the non-SSL port. You need to use the below commands to create the tunnel on the SSL port:
Now use the below URL to access the phpMyAdmin
https://127.0.0.1:8888/phpmyadmin/
You might see a warning that the site is trying to impersonate localhost, but you can skip that. We have knowingly created the tunnel to access the server utilities, so go ahead and access it.
This is how you can access the services running on your AWS LightSail server which are only accessible from localhost URL. So access your PHPMyAdmin on AWS LightSail server and manage your database easily.


it should be ‘http://127.0.0.1:8888/phpmyadmin/’
Thanks for pointing it out. I have updated the post with the correct URL.
Great post thanks – it helped me out
Hey Sanjeev, the post still has http://127.0.0.1:8888/phpMyAdmin/, but http://127.0.0.1:8888/phpmyadmin/ worked for me. (Sep 14 2022)
I’m trying to connect on a windows machine and did all of the steps correctly, but when I go to ‘http://127.0.0.1:8888/phpMyAdmin’ I just get a “page not found” error, what am I doing wrong?
Hi, the URL needs a forword slash at the end. I have updated the post, please try again with that URL.
phpmyadmin should also be all lower case, not camel case (phpMyAdmin)
Hi there, could you show an actual example of, how the command looks like?
‘Just replace location_to_private_key and AWS_SERVER_IP_ADDRESS to the actual values and you will have an SSH tunnel created to your WordPress installation.’
Thanks!
When you get to the login screen, what is the username and password for PHP My Admin? Where do you access/edit that information from?
I used DB_USER and DB_PASSWORD from wp-config.php and that worked for me.