Here is a tutorial that will help you set up and serve your content from a CDN service. So check this, if you are planning to enable the CDN services for your blog.

CDN services have become one of the essential parts of the blog setup these days. As blog loading speed has become one of the crucial factors for search engine rankings, people want to make sure they utilize the resources properly.
Table Of Contents
What Is A CDN?
Content Delivery Networks (CDN) are independent server networks which do not do any processing, just server the content to the readers. They can have multiple servers at a different location and serve the content from the server closer to the user location.
CDN can help you serve the files from the closest location of your readers. They cache these files around the world in different locations and serve them from the server which is close to the readers. This way it does not impact the page loading time and increase the bandwidth availability of your server.
Should You Use CDN Service With WordPress?
WordPress is only a content management system, so it will serve the content from the server on which it is installed. In case you have a server in North America and your users are in Europe, the content will be served from the North America server. It can add delays which can be reduced by the use of a CDN service.
So, the answer is Yes. You should use CDN services with WordPress.
When You Should Enable CDN
One of the questions which I get very frequently is when you should enable CDN support for your blogs?
Many people want to know if they need to wait for the traffic before enabling CDN or should they need to go ahead and invest without any income?
This is a catch 22 situation, you won’t start generating enough income in a short time without CDN support and most of the CDN services usually start with a fixed basic cost.
I have started this blog keeping the cost in mind and I am tracking each and every penny spends on this. So I myself have gone through this situation and looked at the costs very closely, this is what I suggest.
You should enable the CDN on your blog from Day One.
Yes, there is no excuse for not providing faster experience to your users and that is particularly true if you are targeting multiple geo-locations. You should enable it on day 1 and make sure your blog has a reduced loading time for your readers.
How To Manage Cost?
Now the next thing to talk about is cost, how should we manage it? So let’s check what I have done with this blog to manage my cost effectively.
Usually, when you start your blog, you would not want higher fixed costs as you would be looking to build your income. So at this time, I prefer solutions which are charged pay per use basis. Once you generate enough traffic that the pay per use cost starts increasing, you can look to move.
There are few CDN providers which runs with a free plan but most of them have some restrictions. I was looking for an option which can provide complete flexibility and faster turnaround. Amazon Web Services is one such provider.
I have already talked about how I have finalized and installed this blog on Amazon LightSail. So it makes sense to integrate another service of AWS with this blog.
Now even if you are running on any other WordPress Shared Hosting, you should still be able to use AWS CloudFront CDN without any issue.
Why AWS CloudFront CDN For WordPress
There are many reasons why I have chosen AWS CloudFront as my CDN provider. If you are new to AWS you get limited usage free for the first full year.
In the free tier, you will get 50GB free data out and up to 2,000,000 http / https request. This should be good enough for most of the starter blogs.
Once you cross the limit, you will be charged for what you use. So there is no fixed monthly cost and you can still provide a better experience to your readers.
What Will You Get?
AWS currently has 19 region and 57 availability zones for its users. What are region and zones?
Region– It is like a geo-location with a collection of multiple zones mapped with a physical data center. Every Region is physically isolated and independent from every other Region in terms of location, power, water supply, etc.
Zones– It’s a logical data center in a Region available for use by any AWS customer. They have all the contingency build so two zones will not fail together.
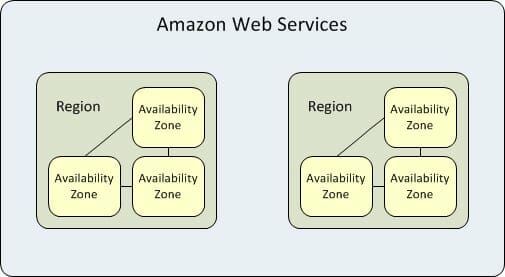
Rackspace blog has a good article to describe region and zones of AWS. For the people from technical background – each region is completely independent. Each Availability Zone is isolated, but the Availability Zones in a region are connected through low-latency links.
These 19 Regions cover geo-locations all over the world and 5 more are planned by the end of this year. So your content will always have a closer location to your users and will be served fast.
Other CDN Options
If you are not so inclined to use Amazon CloudFront, here are some other choices which you can use.
Keycdn
This is another CDN service which charge based on usage only. There is no fixed monthly commitment upfront. You will also get 25GB free for the first month as a new customer.
Keycdn prices are one of the most competitive. They charge almost half the price of AWS CloudFront. The more you use their CDN service, the cheaper it becomes.
The only drawback for their service is minimum payment to buy Keycdn credits. Currently, the minimum payment is set to $49 which will give you Keycdn credit of the same account. These credits will expire in one year or you have to make a $49 payment again to carry them forward.
For a new blog $49 may be little expensive, so let me make it easy for you. You can use the below link and signup for Keycdn, this will give you $10 credit which will help you go for some months without any issue. You can reload the amount once these credit are expired.
StackPath
I also like StackPath (Formally MaxCDN) plans as they provide a good balance between cost and usage. The only issue is their basic plan starts at $10 per month.
StackPath gives 1 TB global bandwidth in its starter plan, if you compare it with AWS CloudFront, they will charge you around $60 – $80 for that kind of bandwidth. So price wise its much different but on AWS, you will only pay for what you have used.
Most of the started blog needs very little bandwidth so StackPath will be costly at the start but becomes a good alternative once your AWS CloudFront expense starts to reach around $10.
My suggestion would be to use AWS CloudFront till your monthly expense becomes around $5. Once you reach that limit than move to Keycdn and wait till you reach to $10 monthly expense before moving to StackPath.
AWS CloudFront Setup
This is very good for the starter blogs as they always have constrained budget. So you will only spend money on the bandwidth which you use. If it’s a new AWS account, you can use it for free up to one year.
Do I need S3 Bucket?
If you start looking for information about AWS CloudFront, you would see many pages talking about including AWS S3 Bucket and CloudFront to WordPress. So many people get confused that they need to create an S3 bucket and then use it as an origin for CloudFront.
No, You don’t need S3 Bucket for using AWS CloudFront with WordPress.
Also remember that S3 bucket gets charged separately, so until you have a business need to use it, I would not recommend it. Though in a specific condition you may need an S3 bucket, the cost for that is very minimal. I will explain it later in the post.
How to Enable AWS CloudFront CDN Service
There are two steps which you need to complete to enable AWS CloudFront for WordPress.
- Enable pull service in AWS CloudFront to fetch your files. AWS doesn’t charge for incoming data so this data transfer will be free of cost.
- Point your files to AWS CloudFront in your WordPress install so it can be picked up from there.
Don’t worry both the steps are very easy to accomplish.
Enable a Pull Service
You can go to your AWS Console and look for CloudFront service. Now you need to create a new distribution, which will be used to supply your files.
Once you click on create distribution, it will ask what kind of delivery method you want – Web or RTMP.
Web– To distribute static files from your blog
RTMP – To distribute media files like audio and video
For our usage, we can select Web as we will be serving files from our WordPress installation. You need to enter origin details in the next screen.
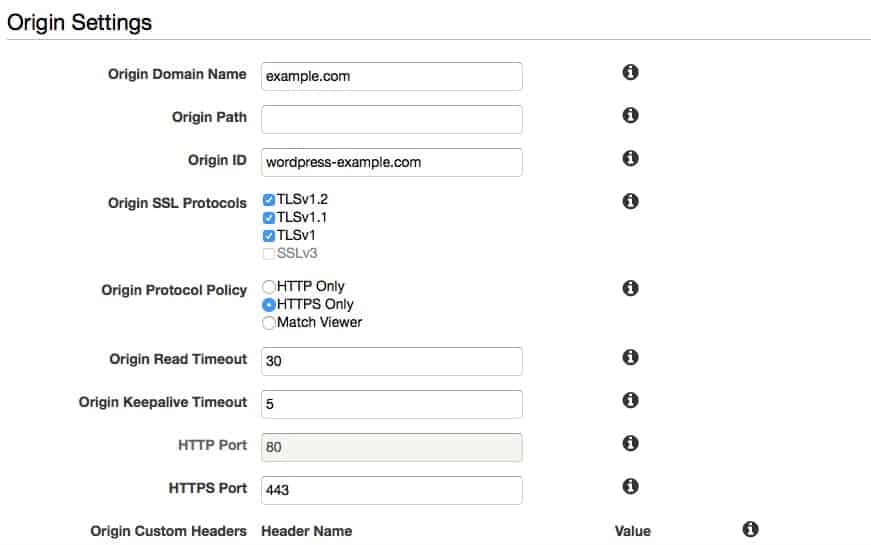
Specify the origin domain name, protocol policy, and other general settings. There are few important settings which are mentioned below:
Origin Domain Name– Domain name for your blog which needs to be integrated with AWS CloudFront. If you have a subdomain to serve the images or other static assets, you can give that. Otherwise, it will be the primary domain name for your blog.
Price Class– AWS is charged differently based on the region, so if you want to avoid pricier location and want to serve content from certain regions, you can select here.
Alternate Domain Names– If you want to use your own CNAME rather than the AWS provided name, you can set it here. Alternatively it will create a domain name for you, which might not be easily readable. So if you want to change it, you can do it here.
Geo Restrictions– If you want to restrict your content at some geo location, you can do it here.
You can also set your HTTP vs HTTPS settings also here, decide how you want to serve your content. If you have enabled https and want all HTTP requests to redirect to HTTPS, you can set it up here.
Enable AWS CloudFront In WordPress
Once you have created a distribution, it will pull all the files from your sites and will cache it in AWS. Now you need to point your WordPress to AWS distribution for your static files.
You can do that with W3 Total Cache plugin, it provides support for AWS CloudFront. Before you make that connection, you need to create an access id and security key for your AWS account.
You can just enable it and set it as a mirror also but that doesn’t give fine grain controls. So I prefer the access id and security key method.
Create an access ID and security Key
You can go to AWS Console and look for IAM. Create a new user and give it any name you like. Select the Programmatic access method under access type, we do not want that user id to login to AWS console.
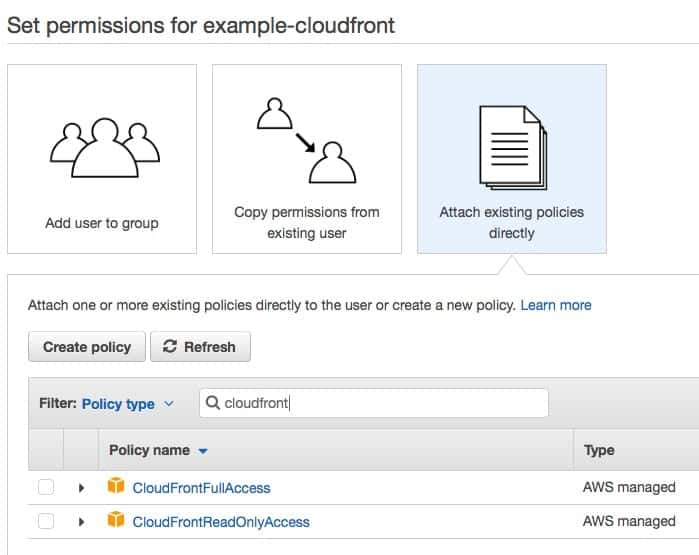
Now you need to provide authority for CloudFront to this user. Attach pre-made policy CloudFrontFullAccess and CloudFrontReadOnlyAccess to the user. Once you are done, it will generate an access id and secret key, make a note of it.
Update W3 Total Cache
Now go to General Setting in W3 Total Cache and enable CDN with Amazon CloudFront. After enabling it, you need to create a connection to AWS.
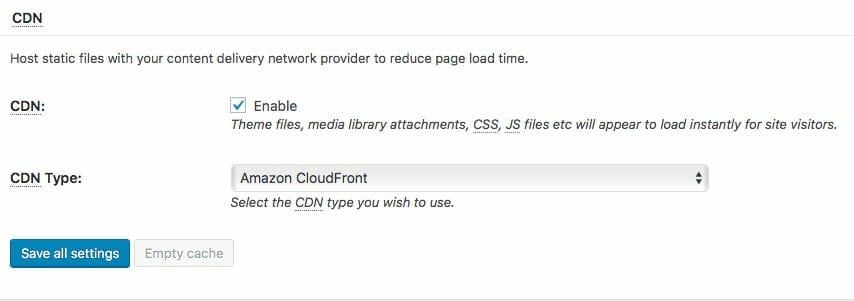
Go to CDN page and it will ask for access id, secret key and domain name. You can enter the details and it will create a connection to AWS.
Domain name will be what you have given in CNAME section of CloudFront or will be assigned for you. You can get it from AWS CloudFront dashboard.
You can update what kind of files you want to serve from your CDN and W3 Total Cache will update the links to point to CDN. Now if you open your blog, your static files will be served from AWS CloudFront.
One thing which you need to note is CloudFront charges for file invalidations. So if you want to clear your cache and manually invalidate the cache, there will be a charge. First, 1000 Files / Path are free, after that you need to pay. So be careful while invalidating the cached files.
You can also skip using CDN for logged in users or administers, if you want to save some cost. But I would recommend to periodically check your blog as a normal user. You may want to keep it as close as other user of your blog so all gets a single consistent view.
You can also set it up with WP Super Cache with ease, just provide the alternate URL and enable the CDN support, it will start serving the file from AWS CloudFront.
Remove Duplicate Content Issue For CloudFront Domain
If you have used your domain name as an origin in your CloudFront distribution, you may be surprised to see that your complete site is accessible from the CloudFront domain name. This is because AWS CloudFront is capable of caching the static and dynamic content to deliver it through its network.
So if anyone request a dynamic content like post URL from CloudFront domain, it can cache it and serve that request. For Google, this is another URL which delivers the same content and if it starts indexing those URL, it can create a duplicate content issues on CloudFront distribution.
To make sure Google does not index these URLs, you need to add a Robots.txt file on the CloudFront domain which will block the search engine crawl. So your main site robots.txt should be different than the one served with CloudFront.
Create S3 Bucket
This is where we need an S3 bucket and will use CloudFront capability of multiple origins to resolve this issue. Create a new S3 bucket and mark it as private as we only want it to be accessed by CloudFront only.
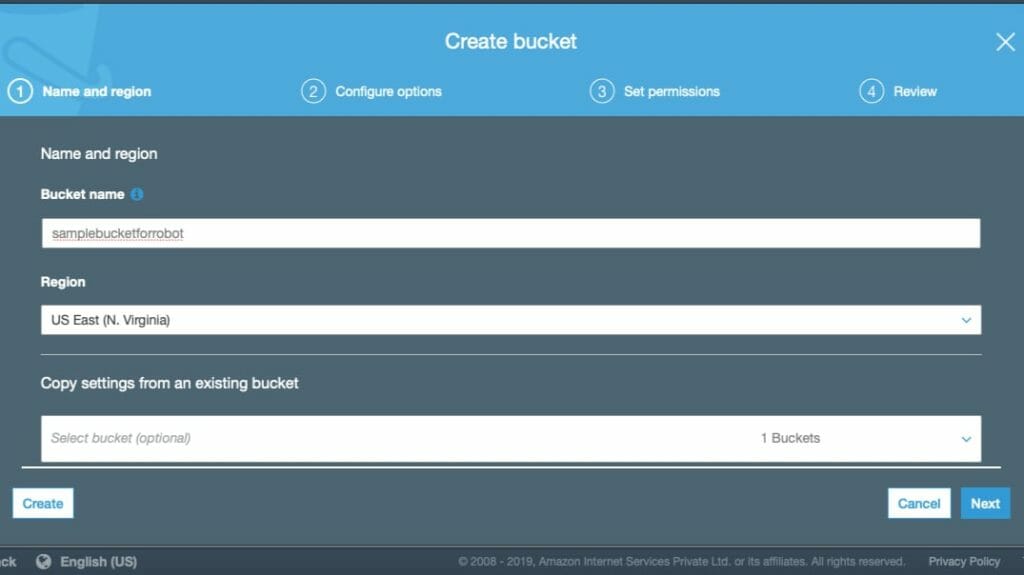
Now upload a new robots.txt file in this S3 bucket with the text mentioned below.
User-agent: *
Disallow: /
Once you have the file added to the S3 bucket, we can go ahead and update the CloudFront Distribution.
Update CloudFront Distribution
CloudFront is capable of caching content from multiple origins and delivering it. If there are clashes in those origins, they will be resolved based on behavior set in the distribution settings.
Add Origin
What we want to do is add the S3 bucket as an origin and give it a higher priority than your site. This will make sure that if someone requests robots.txt from the CloudFront domain, the file in S3 will be delivered. If you request the robots.txt from the site URL, it will still return the original file.
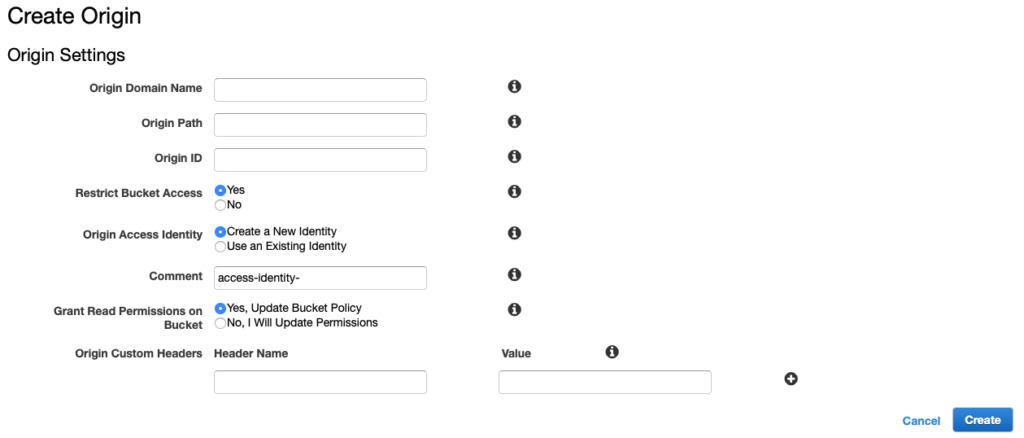
Now, go to your CloudFront distribution and add a new origin. Select an S3 bucket as the origin domain name and update the below settings.
- Mark ‘Yes’ for Restrict Bucket Access
- For Origin Access Identity, create a new identity if you do not already have one. Give a comment to identify the new identity.
- Select ‘Yes, Update Bucket Policy’ to grant the read permission on the S3 bucket. With this, the bucket will be accessible from the CloudFront.
This will make sure that users can only access the bucket content with the CloudFront URL only.
Add Behavior
Once the origin is created, we need to update the behavior to give this origin a higher priority for robots.txt. Click on Create Behavior and add robots.txt in Path Pattern.
Select an S3 bucket as the origin and update other settings on how to deliver that file. Once done, make sure that it has a higher Precedence (lower number) in the behavior list. This will make sure that the robots.txt will be searched in the S3 bucket first.
Now, you are all set and will not receive the duplicate content issue for your CloudFront distribution.
That’s how you can enable the CDN service for your WordPress blog with AWS CloudFront. Which CDN service are you using for your blog and when did you enable it? Did you wait for some before using the CDN service with your blog?







Hi,
Your explanation is easy to understand. Thanks for sharing. But can you explain further explain on “One thing which you need to note is CloudFront charges for file invalidations. So if you want to clear your cache and manually invalidate the cache, there will be a charge. First, 1000 Files / Path are free, after that you need to pay. So be careful while invalidating the cached files.”?
AWS CloudFront charges for every cache invalidation which means you have one file cached and you update the file, it needs to invalidate the file and cached it again. Only 1000 invalidation paths are allowed per month. The easy way to get around that is by giving a different name to the updated file so that it doesn’t have to invalidate the cache. I mentioned that so people will be careful while making changes to the settings of CloudFront Distribution or updating their sites.
Understood. Thanks for your clear explanation. (Thumbs Up)