AWS has upgraded their LightSail infrastructure to include Load Balancer for horizontal scaling. Here is a step by step guide on how to set up Load Balancer with your WordPress Site.
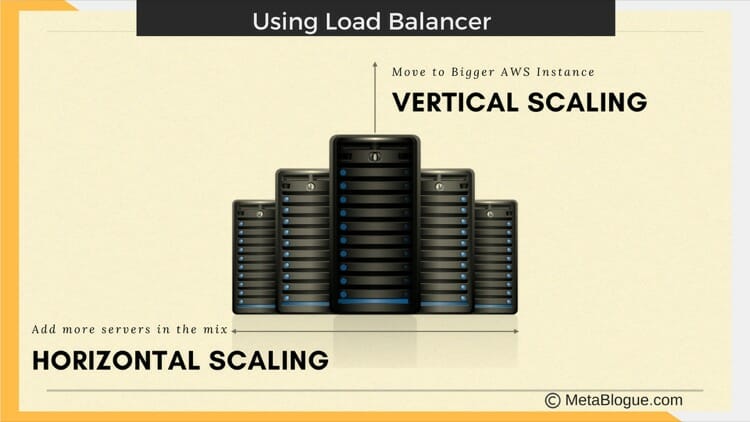
You can always upgrade your AWS LightSail server by starting a more powerful instance and moving your WordPress blog to it. Now they have enabled AWS Load balancer which can help you add more than one server in your WordPress setup.
I am a big supporter of AWS Ligtsail hosting service, which allows you to start your blog for as low as $5. You can start with the $5 instance and slowly move to bigger servers as traffic builds up.
But sometimes just adding more resources to a single server is not enough. AWS LightSail also has a limit, once you reach their biggest server, you can’t add more resources.
In this post, we will discuss how you should plan to scale your servers. You can use the below TOC to jump to a specific section.
Horizontal Scaling VS Vertical Scaling
Before we talk about the correct way of scaling and load balancer, we need to understand types of server scaling.
There are two scaling methods which you can use to support the increased traffic -Horizontal Scaling and Vertical Scaling.
Vertical Scaling
It’s a method to increase resources on your server so that it can support the increased traffic.
For Example, if you are using AWS LightSail $5 instance which is handling around 100 people per day for you. If your traffic gets doubled, you will move to $10 instance. This is Vertical Scaling as you have added more RAM and Bandwidth to your server so that you can handle the extra traffic.
Horizontal Scaling
It’s a method to include additional servers in the mix, which can help you serve your website to a greater number of people.
For Example, if you are using AWS LightSail $5 instance which is handling around 100 people per day for you. If your traffic gets doubled, you add another $5 instance. So now, there is two $5 AWS LightSail instance which can handle your site requests and you can distribute your traffic to those servers. In this case, you can still serve twice the number of people, but you have used Horizontal Scaling.
Which one is good?
As you have seen in the above example, you can use either horizontal scaling or vertical scaling to handle the same situation. So, which one is good and should be used?
There is no correct answer. It depends on how you want to handle it and how much growth you are expecting for your site.
My personal preference is to handle initial few upgrades with Vertical Scaling. I prefer moving to bigger server till I reach $40 instance, after that, I will look for horizontal scaling.
It also depends on how much downtime you can tolerate. If anything happens to your server and you were using vertical scaling, your entire site will be down. With the horizontal scaling, your other server can still serve your website. It might have to take more load and response time will take some hit, but your site is still up.
So, your scaling strategy should be a good mix of horizontal scaling with vertical scaling. Remember, you can use a mix of servers in your horizontal scaling. Like one can be a $5 instance while other can be a $10 instance and you can divert the traffic accordingly. You can also scale both the server vertically as needed based on your traffic.

Join AWS LightSail Facebook Group
Connect with like minded people and help each other manage AWS LightSail WordPress installs.
How To Do Vertical Scaling
AWS LightSail comes with an easy method to do a vertical scaling. You can just create a snapshot of your current instance and start a bigger instance with the snapshot.
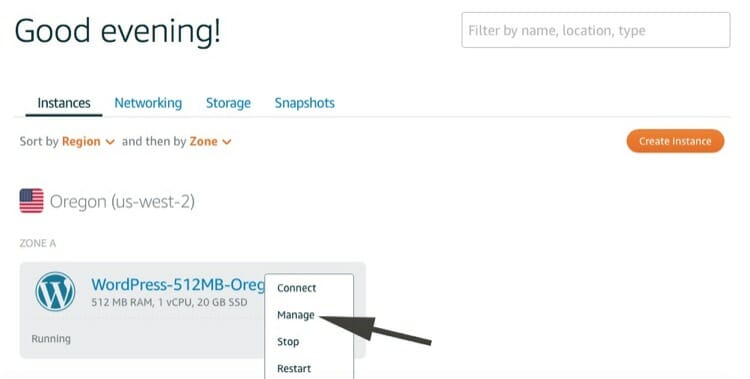
1) Go to Your AWS LightSail Panel and click on manage for the Instance you want to vertically scale.
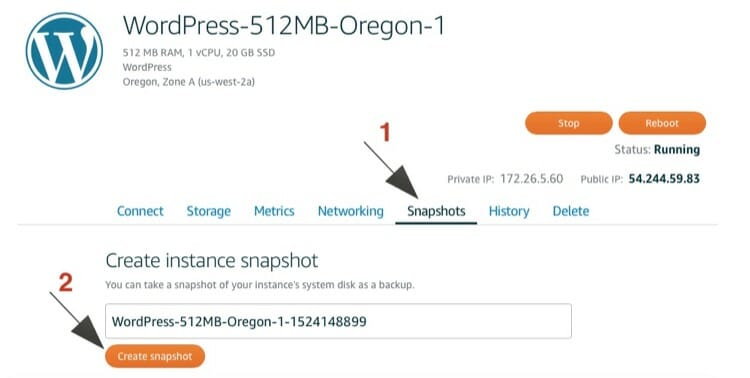
2) Click On Snapshot and create a snapshot.
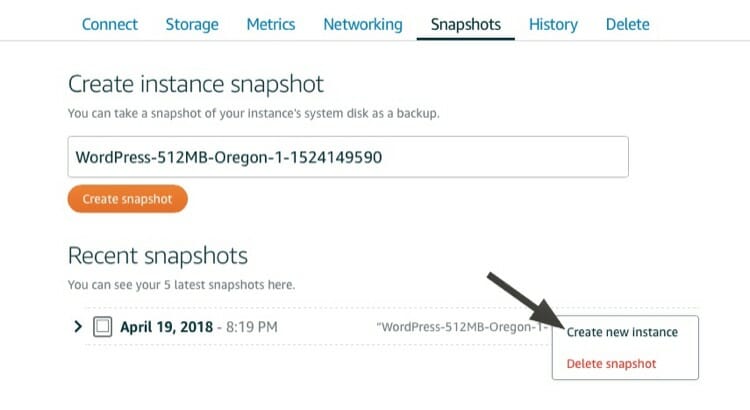
3) Once the snapshot is created, you can create a new instance with that snapshot. Just select the bigger instance and create it.
4) Now, you can attach the static IP of your site to the new instance.
5) Verify your site, if everything looks ok, you can delete your old instance.
That’s it, you now have your site running on a more resourceful server and can handle more traffic.
How To Do Horizontal Scaling With AWS Load Balancer
Vertical scaling is easy as you can just move to next available server and increase the resources. Horizontal scaling need bit more planning and understanding of what you are trying to achieve.
It’s not about adding an additional server in the setup, you need to define the roles and responsibility of each server.
Also, you need to make sure that your users should not see a difference in your site, irrespective of the server they land.
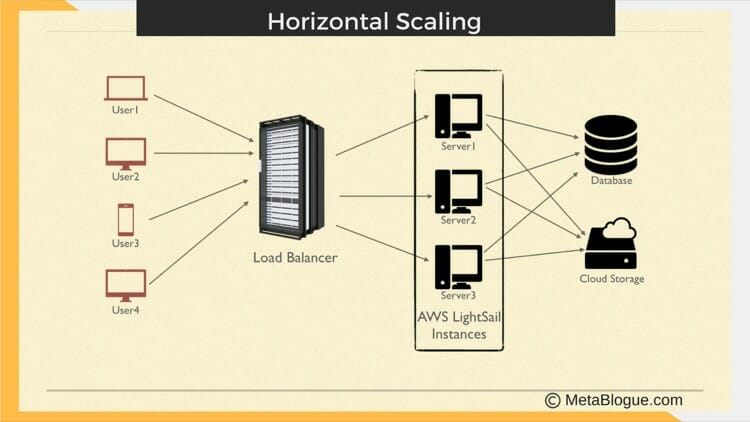
To do that, we need to separate the WordPress installation in such a way that multiple instances can still run as a single site. You have to divide WordPress into 3 different sections – Images, Database, and Core WordPress.
The idea is to have multiple servers with Core WordPress and a separate server for the database. Images can be stored on any cloud-based solutions so multiple instances can access it.
Once your WordPress database is separate, multiple servers can connect and display the same content. It will also help in case you are making an addition to the database like adding a new post. It will be visible to other servers instantly. Each Core WordPress server can do it’s own caching to server the site faster.
Here is a basic horizontal scaling diagram to explain the connections which we are planning to create. This will help you visualize what we are trying to achieve.
Now if we are clear with the setup, let’s see how we can implement it.
Enable VPC Peering
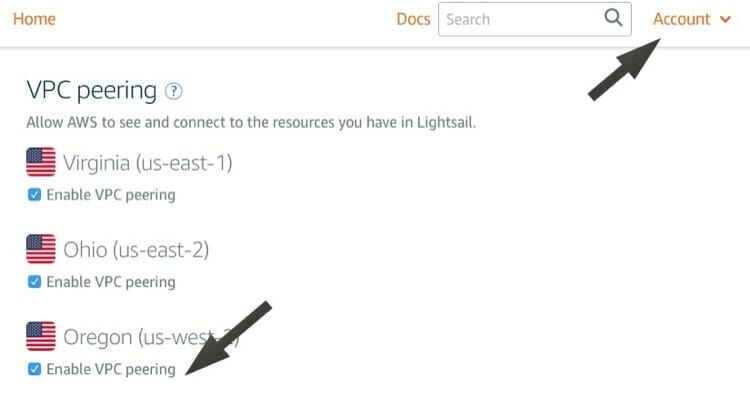
You need to enable the VPC Peering to use the other AWS services along with AWS LightSail. We will be using AWS RDS service to create a MySQL database for the WordPress.
You can go to AWS LightSail Account Page and enable the VPC peering from Advanced tab. Just check the box and wait for some seconds before it gets checked. Once done, you can access normal AWS services along with AWS LightSail instances.
WordPress Database Creation
There are two ways you can handle this. You can create a new LightSail instance and install the MySQL service on that or you can use AWS RDS (Relational Database Service) service.
I prefer AWS RDS Service as it allows you to scale your database also. You may want to start with a single server but can add a failover server so your database won’t go down.
There are two type of databases which you can use under AWS RDS – MySQL and Amazon Aurora (MySQL Compatible).
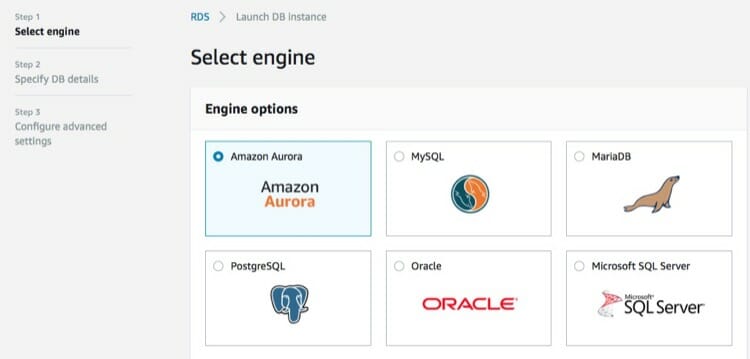
Amazon Aurora is a cloud-based implementation on MySQL database which provides 5 times faster response time than the standard MySQL server. It gives 99.99% uptime and built on fault-tolerant and self-healing storage. So I would suggest using Aurora rather than a regular MySQL instance.
Create Amazon Aurora Database
Once you select the Amazon Aurora in Amazon RDS, click on Next. You will be asked some details about the instance you are creating including the master account and password.
First, select the instance which you want to create for your database. Your charges will be based on the type of instance you use. You can calculate your monthly charges with the help of AWS Simple Monthly Calculator.
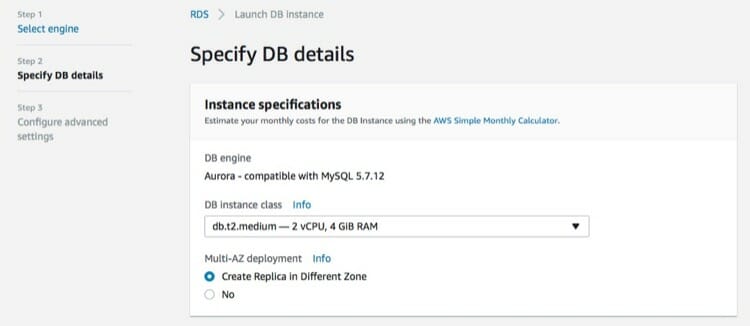
You also need to select if you want to create a replica of your database. In case of failure to your main server, it will automatically fall back on the replica. So you get a high availability for your data. Keep in mind that replicas are also chargeable, so only select if high availability is a must for you.
Once done, you need to provide additional information about the instance and root user.
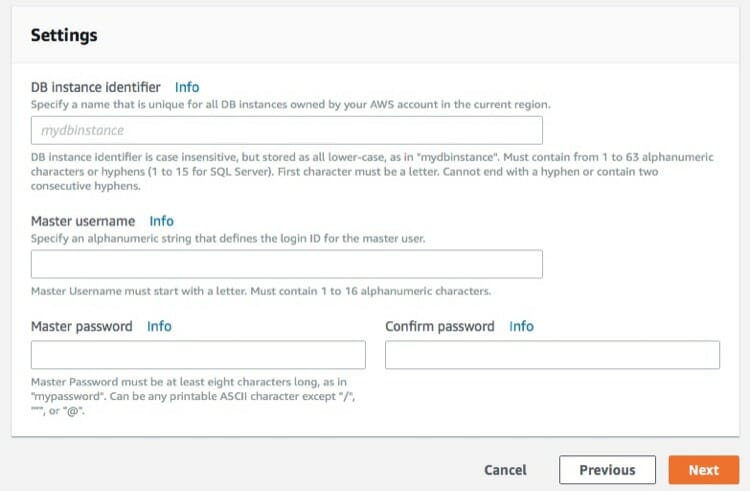
The DB instance identifier is like a server name so you can identify this instance easily. Once done, click on Next.
You need to add some more advanced options in the next panel like access method, database name etc. Complete that and create a MySQL database server.
If you are still under the free tier usage, you can also think of installing a MySQL server on EC2 instance. It will save some money for you.
Install WordPress on AWS LightSail Instance
Once you have created an Amazon Aurora database, its time to install the WordPress. I have a detailed guide on how to install WordPress on AWS LightSail, you can follow it in case you need any help.
The only change you need is that you need to connect your WordPress installation to Aurora Database rather than installed on the instance.
You can edit the WP-Config.php file to change the database connection.
You can change the Database name, username, password, and hostname for your MySQL database. Just take the endpoint address of your Aurora instance, DB Name, User Name, and Password from your AWS Console and update the WP-Config.php.
Once you do that, go to your site and you will see with WordPress welcome page. Just enter details and let it create the WordPress tables in that dataset.
You don’t need to install the SSL certificate on the AWS Lightsail Instance as your certificate will be installed on Load Balancer.
Cloud Storage for Images
Next thing which you need to setup is a central storage for your WordPress images. By default WordPress store the images in the local directory but if you are going to use multiple servers for your site, you can’t have them save images on local storage.
If WordPress is saving the images on local storage, your images will be scattered across the instances. This will make images disappear randomly on pages based on which instance you are connecting to.
You need all WordPress server to be able to access all the images. So you should set up a cloud storage for your images.
Setup Amazon S3
To move your WordPress media to the Amazon S3 bucket, you need WP Offload S3 Lite WordPress plugin. You can install the plugin from the WordPress repository for free.
Once you have installed the plugin, you can connect it to AWS Account from the WordPress dashboard. This plugin copies any new image upload to AWS S3 bucket.
Once you installed the plugin, you can go into Settings -> Offload S3 to set the plugin.
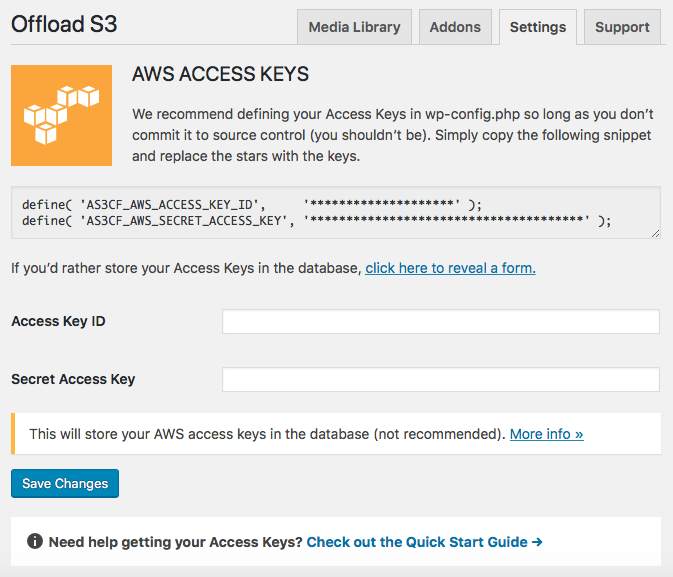
The preferred way of doing this is by editing WP-Config.php. Copy the two line, add it at the end of WP-Config.php file. Replace the Access Key ID and Secret Access Key from your AWS account to make the connection.
Once the connection is made, you can select the S3 bucket from the WordPress dashboard. This S3 bucket will be used to copy your image files. You can also check some other settings like deleting the file from your local server after it is copied to the S3 bucket.
What about Themes and Plugins?
Themes and plugins are also going to face a similar problem as media. There are few options to handle them.
The first option is to do the updates manually through FTP. Download the plugin and upload the files with the help of FTP client. As plugin settings and data will be stored in the database, every instance will be able to pick it up correctly.
Other Option, You can delete all the instances except one and do the theme and plugin update. After that, start new instances with the snapshot of the updated instance. This way all your instances will have updates propagated. I would only recommend this method if you do not allow your users to log in.
Create Multiple WordPress Instance
Once your WordPress instance is correctly setup, you can create multiple instances to replicate it. You can use the snapshot method as described above to create those.
You don’t need to use the same capacity for those instances but I would recommend it to distribute evenly at the start. Later on, you can vertically scale your servers as required.
Create a Load Balancer
Now your WordPress Server, Database Server, and AWS S3 bucket are ready, so you can go ahead and create a Load Balancer. You can create a Load Balancer under Networking tab of AWS LightSail Home screen.
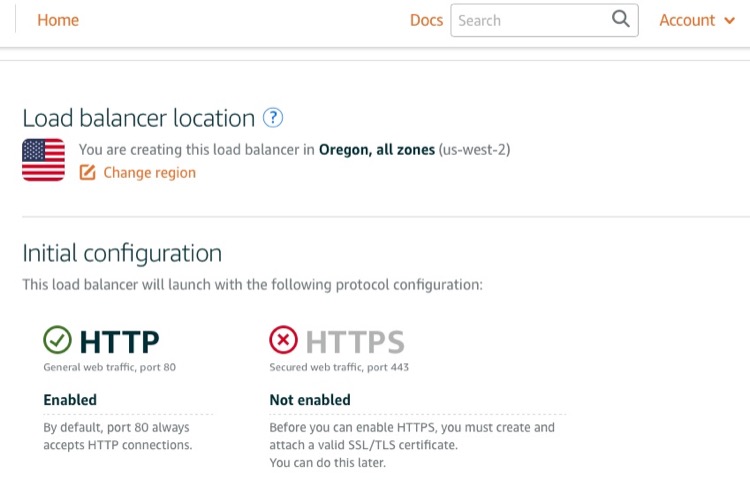
Just select the location, keet the HTTP for now and give it a meaningful name.
Now you need to add A type record in your AWS LightSail DNS zone so that the incoming traffic can come to Load Balancer. You can use this step by step instruction provided by AWS support guide to do that.
Attach Instances
Once you have incoming traffic coming to Load Balancer, its time to let it know where to send them.
1) Go To Networking Tab and click on Manage the Load Balancer.
2) Attach the instance to Target Instances.
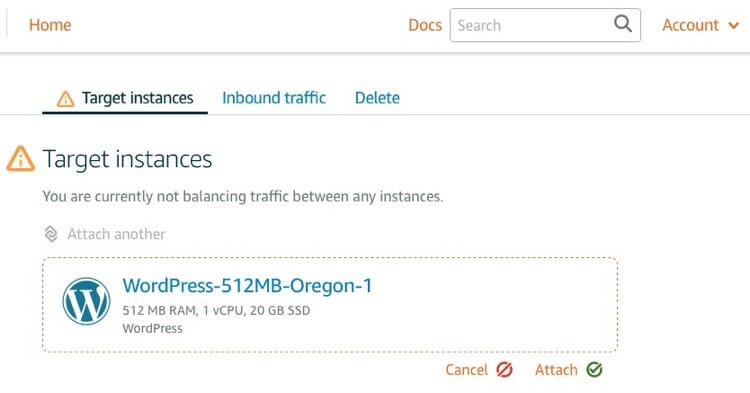
3) You can attach multiple instances to the load balancer and your incoming traffic will be distributed to those instances.
Enable HTTPS Port
By default load balancer servers the incoming traffic over HTTP. If you want to enable an SSL certificate for your site, you can do it on the Load Balancer. This certificate will be used for all instances so you don’t need to install it manually on each instance.
AWS support team has put together a good step by step guide on how to enable the SSL certificate. So go ahead and check the support document.
If you face any issue in following this step by step guide, let me know in comments and I will try to help.
Session Persistence
Another thing which you need to check is session persistence. If you allow people to log in to your site or use WooCommerce plugin to sell things, you might want to turn this on.
Under inbound traffic tab, you will find a setting for Session Persistence. Just check it and Load Balancer will make sure logged in users will use the same instance for repeated visits.
This way if your users have saved something in their cart, they will see it constantly and will be able to purchase it easily. Otherwise, they sometime might not see things in the cart as they will be served pages from other instances.
So this is how you can do the horizontal scaling with the help of load balancer in AWS LightSail.
There can be many different server configurations that can be done with horizontal scaling. I have tried to explain a simple setup so you have an idea of how to go about it. Now go ahead and design Horizontal Scaling strategy for your AWS LightSail Site with the help of Load Balancer.





Hi very very useful this writing thanks for writing
I have a developed one website in wordpress with themeforest theme I am using lightsail instance 8GB ram and separate database instance with 1GB ram when concurrent user reach around 100 some users unable to access website I got error “This site can’t be reached” should I go vertical scaling or horizontal scaling ? also should I upgrade database?
This is an excellent article, thanks. My only suggestion would be wrt plugins and themes. I do my builds locally using VVV then git commit code to CodeCommit and pull from there to my instances. This is much safer and allows versioning as well as easy rollbacks.
I can also set different instances to pull from different branches so I get A/B testing when I want it. There are deploy pipeline options to automate this for dev/test sites but I always pull manually. Once bitten…
Hi Charles,
Thanks for your comment. Your setup looks good and much better with the CodeCommit integration. Any advanced user should look for this kind of setup, much safer and easy for update rollout.
– Sanjeev
Sanjeev, really informative article. You motivated me to switch to horizontal scaling before I went to production stage. I do have a woocommerce store and I got a little bit confused about manual update of the plugins. Do you have to manually go to each instance and upload plugin and theme updates through FTP or there’s a way to do it one time to all instances? And another question when I manually upload plugin/theme files it takes a lot of time if I do it with a folder. So I upload zip and unzip in on the server. Is it a good solution or you know better one.
Thank you in advance,
Andy
Hi Andy,
The better way of updating your servers would be to apply all the updates on one server. Take a snapshot of that server after the update and create instances from that snapshot. Once done, you can remove the old servers from the load balancer and attach the new one.
If you want high availability, attach all the new instances first so that you won’t face any outage. Once done, remove the old servers.
– Sanjeev
While definitely a viable and easy solution I did see in your thread that it is not the best one for woocommerce type of websites. What would be the best for woocommerce solutions?
Hi Andy, the better and more robust approach is to use some kind of code management software like mentioned in the Charles comment above. That way you can control how the updates are rolled out to your servers. I think that can be a topic of my next tutorial on how to set this rollout process with the help of CodeCommit or Github or setup Test and Production environment.
For WooCommerce sites, I found the easy way is to decommission all the servers except one. Do the update, as only one server is there, updates will happen there only and database changes will be rolled out easily. Reimage that server and bring new instances. Though this process has an issue of rolling back the changes in case of issues. That’s why the above-mentioned way is better as you can set up a testing site to check the updates before moving them into production.
Hi, I already have a route53 dns zone setup. I don’t understand why I would need to set up dns in lightsail as well? Does one overrride the other or do they share information?
If I already have instances running in ec2 under my route 53 dns zone, when I setup lightsail dns will that override the route 53 dns and break the dns for my existing route53 machines? Thanks!
Hi Ron,
LightSail DNS is also based on Route53 but it’s free to use up to certain limits. If you already using Route53 and would not want to move because of EC2 instances, you can add the DNS records in Route53.
Though you can keep the existing EC2 records in Route53 and create a DNS zone in LightSail to manage only the lightsail instances. Both can co-exist, but make sure you only have 1 entry for a domain (a domain can either be on lightsail DNS or in route53, not at both places).
– Sanjeev
This was extremely helpful, thank you! I went through setup and everything worked but having one issue that i have no clue how to fix – woocommerce subscriptions, well, actually also scheduled emails and probably everything that is “scheduled” will need the same fix/solution – any suggestions or examples on how to handle this?
Example: setup one perfect “master” instance, then replicated it and connected to load balancer – great, but now woocommerce subscriptions renewals running on multiple instances and charging customers multiple times, to be exact as many times as those replica instances i have… i tried to lookup cron jobs, other settings but not finding straight answers anywhere… ideally only one instance would processes these recurring payments while the rest of instances will simply “serve” content/shop/cart… do you have any experience handling these kind of issues? thank you so much!
Hi Dennis,
Are you using a single database for all the instances or they have their own databases? I understand the issue because of complete website running in multiple instances, even with a single database, you can reach to this situation. Better way to only generate the payment invoices from the Woo-commerce and process the payment at a different server so that duplicates can be removed.
– Sanjeev
if I create 2 wordpress instances at AWS lightsail and I create second instance as your have mentioned (snapshot and create new instance), how to set load balancing for these two instances ?
Hi Larry,
If you have separated the database and want to use load balancing, you need to create a load balancer as mentioned and you can manually attach the instances to the load balancer. Load Balancer option is available under the Networking tab in LightSail dashboard.
– Sanjeev
Where can one set auto-scaling for automatic instance creation inside a load balancer within Lightsail? I have been googling this without luck so far.
Thanks.
Hi Jaime,
Good catch. I didn’t realize that I was answering on LightSail page. Load Balancer in LightSail does not have autoscaling option as of now. You need to manually create and attach the instance.
Autoscaling with the Load balancer in available for EC2 instances only. Hopefully, they will enable that for LightSail also in near future. I have updated my earlier comment to reflect that.
Thanks,
Sanjeev
Hello,
Thanks for the tutorial! I have one issue which maybe you can help with or point me in the right direction:
When I change the database to one on rds i can’t access the wordpress install url, it gets stuck on a redirect loop. any ideas?
Cheers
Hi James,
Please make sure you have enabled the VPC Peering from your account page. It helps in Lighsail’s ability to see other services. Another thing to check will be RDS access mechanism and see if you can connect it from your desktop to make sure the connection is working fine.
– Sanjeev
Your article says –
“The first option is to do the updates manually through FTP. Download the plugin and upload the files with the help of FTP client. As plugin settings and data will be stored in the database, every instance will be able to pick it up correctly.”
–> Themes and plugins DO NOT go to the database. They reside in the wp-content at the root directory under ../htdocs
Q. Is there a specific config?
Questions.
1. If there are 2 instances launched, they have individual root dirs. How is the uploads/ updates persistent?
2. Your use case – Install only one lightsail instance, then update the themes and plugins, then replicate for an LB configuration.
Q. What happens when there are themes/plugins updates or uploads? How does the consistency work on both the instances?
Please can you elaborate how do you configure this?
Hi Jningtho,
Themes and Plugin are stored in the root directory under ../htdocs and they save all their options in the WordPress database. So you should not worry about the saved options as they will be automatically served from the single database instance.
First time when you launch the instances, you can set up the site on one LightSail instance and replicate that for other instances.
After that suppose you have 2 instances, you need to update the plugin or Themes files on both the instances. You can do that with the help of an FTP client. Download the plugin from WordPress site and upload in the respective folder. You need to update the permissions also to make sure that user ID daemon has been set as an owner and has access to it. WordPress runs under that user ID.
Another option is to use a single location for the wp-content folder. You can create a folder on AWS S3 and use WP_CONTENT_DIR and WP_CONTENT_URL option in wp-config file to move your WP-content folder to AWS S3. This way like your database, you will have a single location for your wp-content also and you can update your plugins and themes normally. You may need to create map drive for your AWS S3 location on your LightSail instances.
– Sanjeev
It’s very nice article.
Please help me in following things by writing tutorial like above:
1. How to setup subdomain in AWS lightsail?
2. How to make wordpress faster in AWS lightsail like enabling GZIP Compression, reduce server response time, Leverage browser caching, etc?
Thank you
Hi Abhishek,
I will definitely look for these topics. Keep watching the space as some of them will come soon.
– Sanjeev
Hi, this article has been very helpful. Thank you writing it!
I’ve followed the aws support guide on setting up https and verifying your ssl certificate but I can’t seem to get it to work. I’ve copied the CNAMEs and their values over the Lightsail DNS. I’m not sure if I’ve setup the name servers correctly in route53 though. I have NS record in my record set table with the name server values provided by lightsail DNS. It’s really frustrating because I don’t know how long it’s supposed to take for everything to be verified, the aws support guide just says “after some time” but after some time I just run out of time and I have to start the process all over again. If you can think of anything that I might be missing in my setup it would be very much appreciated, thanks!
Hi Billy,
When you use a load balancer, your DNS servers point to it rather than your instances. So while setting up DNS, make sure you are providing the IP address of the load balancer in your route53 records. For the first time, they might take around 24 hours to install the certificate, after that renewal will be automatic.
– Sanjeev