AWS LightSail is one of the cost-effective hosting infrastructures which allows you to host different kind of websites. In this post I will discuss how we can use the AWS LightSail as a Podcast hosting and set it up easily with WordPress site.
Audio and video are advanced mechanism to reach your audience. More and more webmasters are starting to include audio / video in their content creation schedules. Though both mechanisms can increase your hosting cost exponentially since they need larger hosting solutions.
In this post I will discuss AWS LightSail as a cost-effective solution for your audio files. Currently, AWS LightSail is offering a year worth of hosting infrastructure for free, so you will not spend any money for a year on your Podcast Hosting.
Though we will discuss about AWS LightSail as a Podcast host, you don’t have to host your WordPress website with them. Your WordPress website can be hosted anywhere which can easily be integrated with AWS LightSail Podcast Hosting.
Table Of Contents
AWS LightSail as Podcast Hosting
Nowadays it has become extremely easy to create podcasts, you can even create podcast with your iPhone or iPad. Once you decide to create podcast, next step would be to finalize the podcast hosting and integrate it with WordPress.
There are many specialized podcasting hosts which provides advanced hosting infrastructure but at the start many webmasters might not want to invest that much amount on the hosting. So, I decided to test the AWS LightSail as a podcast hosting solution which can be simple to setup and cost effective for webmasters.
Your WordPress website can be with any host, and you can only use AWS LightSail to host your podcast audio files.
To start with please create an account on AWS LightSail and add a payment method. Though, most of this setup is free for a year, you still need to have a payment method on the account.

Join AWS LightSail Facebook Group
Connect with like minded people and help each other manage AWS LightSail WordPress installs.
Create Podcast Bucket
To setup the Podcast hosting, we first need to create a Bucket which will host all our audio files. A bucket is equal to a storage you get in your traditional podcast hosting.
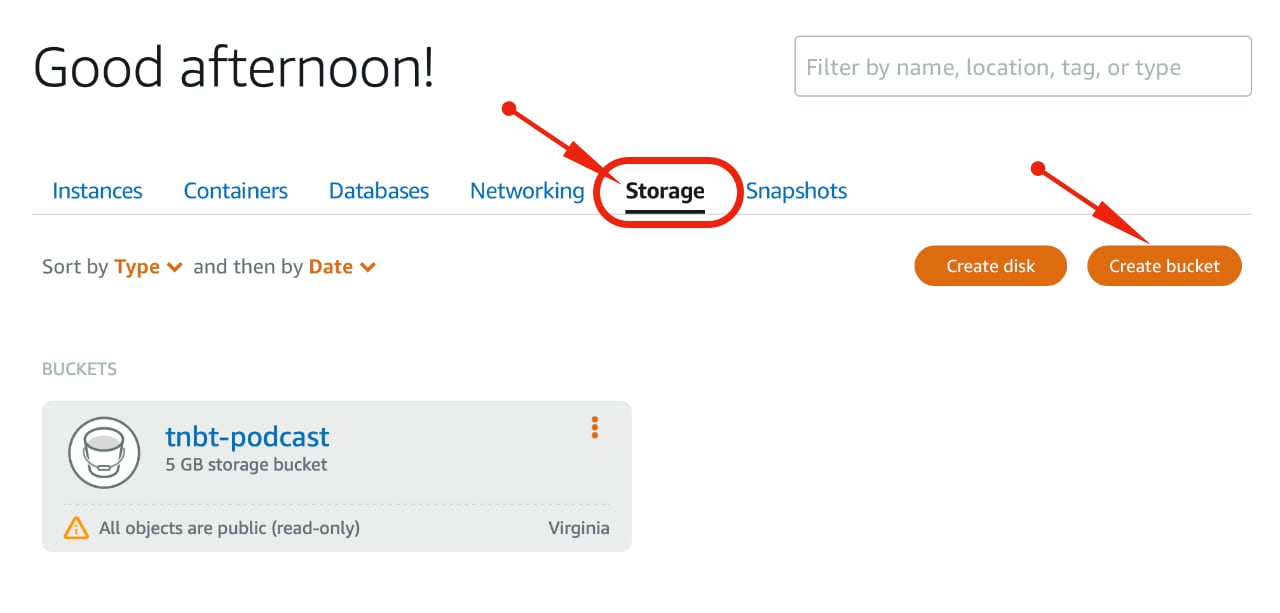
There are multiple different bucket storage plans available based on the storage needs and monthly transfer needs. Though you may need to put more focus on the storage needs as we will use CloudFront to distribute the audio files so we may not utilize the monthly transfer limits.
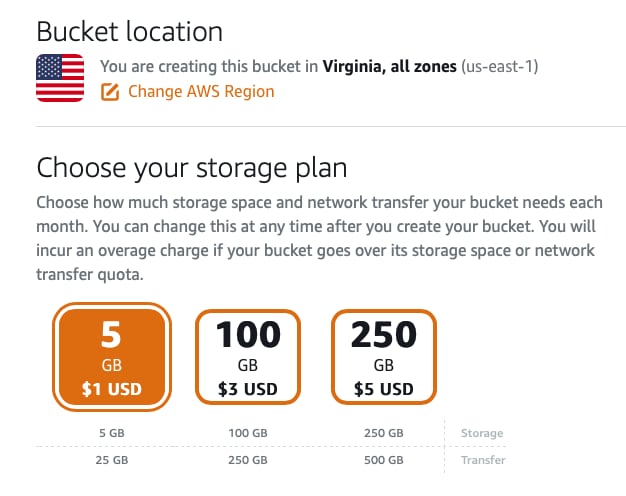
The 5GB storage plan should be good enough for most of the starter podcast owners. You also get 25GB monthly transfer limit with that plan which should be enough with our CloudFront distribution setup.
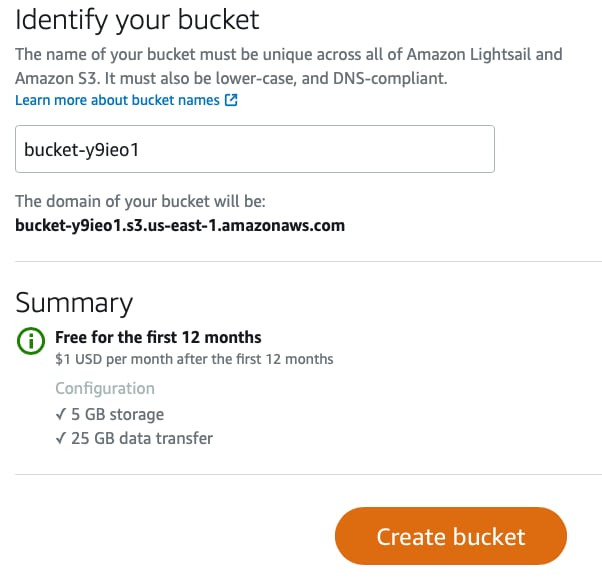
Just give a unique name and create your bucket for the audio file hosting. You need to make sure that you are following the rules for the name, and it is unique across AWS infrastructure including AWS S3. Since the bucket infrastructure is build using AWS S3, the name cannot be same for any other S3 bucket also.
You can also note that the first storage plan (5GB Storage) is free for first year. So, you will not be charged anything for the first year and after that you will pay $1 per month for this bucket.
Setup Bucket Permissions
Once your bucket is setup, you need to upload your files and set the access permissions. You can upload the files from the AWS LightSail console.
Go to Storage -> Your Bucket and you can drag and drop your files to upload on the bucket.
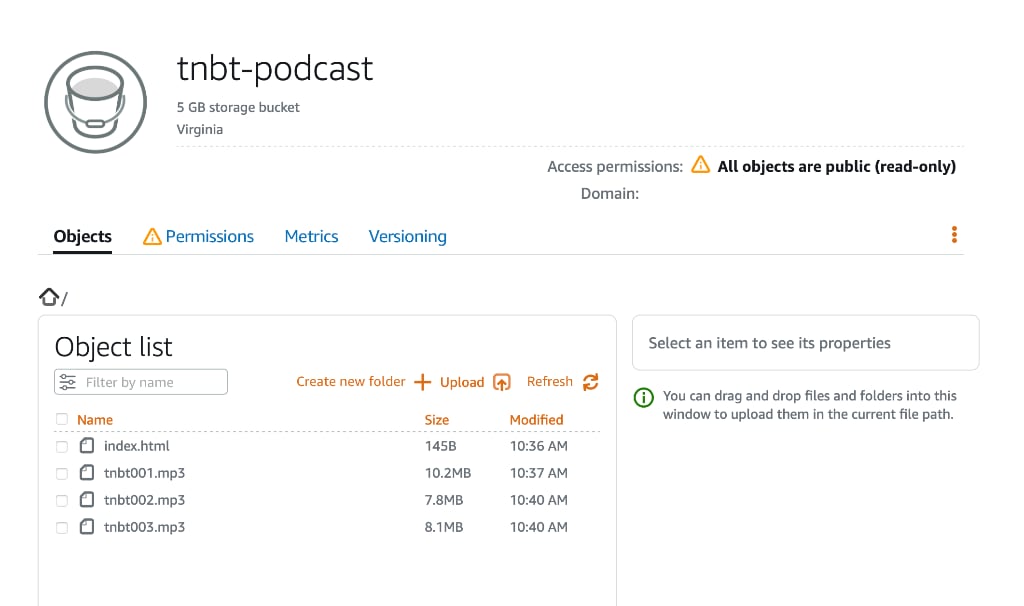
Once your initial files are uploaded, you can click on the Permissions tab to allow your WordPress instance to read these files.
Since we are only hosing our Audio files which will be accessed not only by our WordPress instance but other podcast distribution networks also, we need to make it a public read-only bucket.
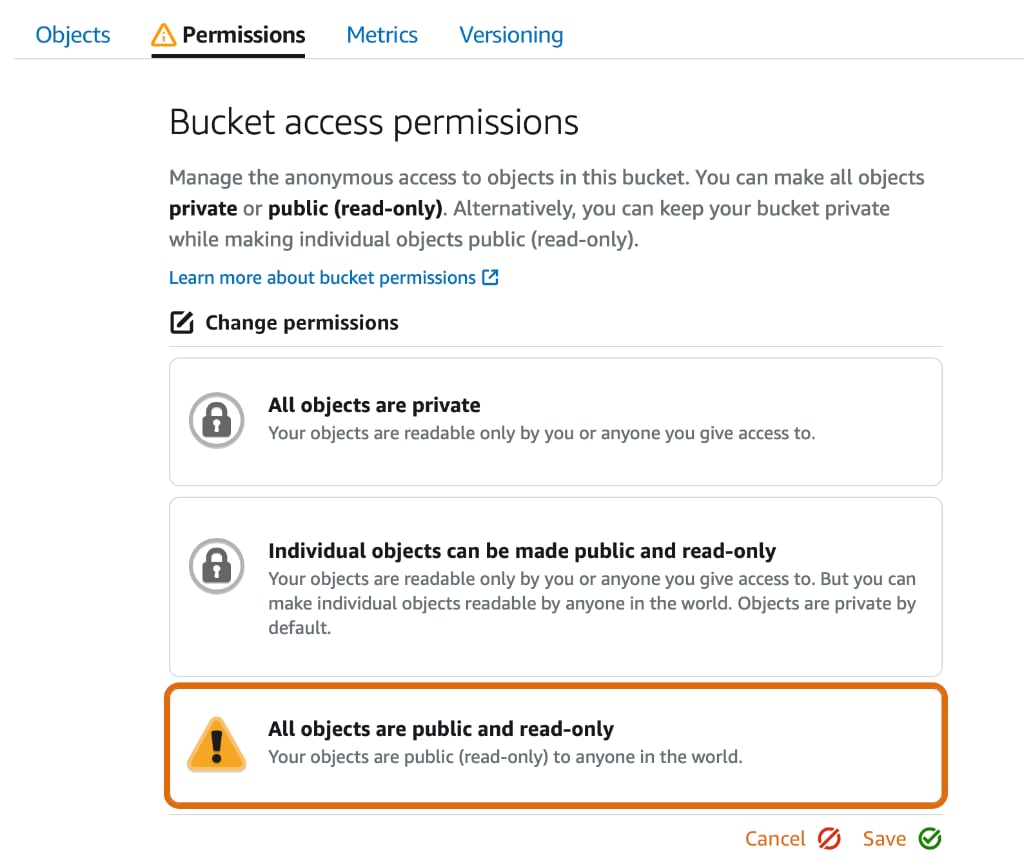
So, click on Change Permissions and select – All Object are public and read-only. Now your WordPress instance can easily read the audio files from this bucket.
Setup LightSail Distribution
Though you are all set for your Podcast hosting, since each object in this bucket will get a unique URL which can be used to access it. But we will take it a step further and set up a global distribution so that the load time of the podcast can be optimized.
You can create a new distribution from Networking -> Create Distribution.
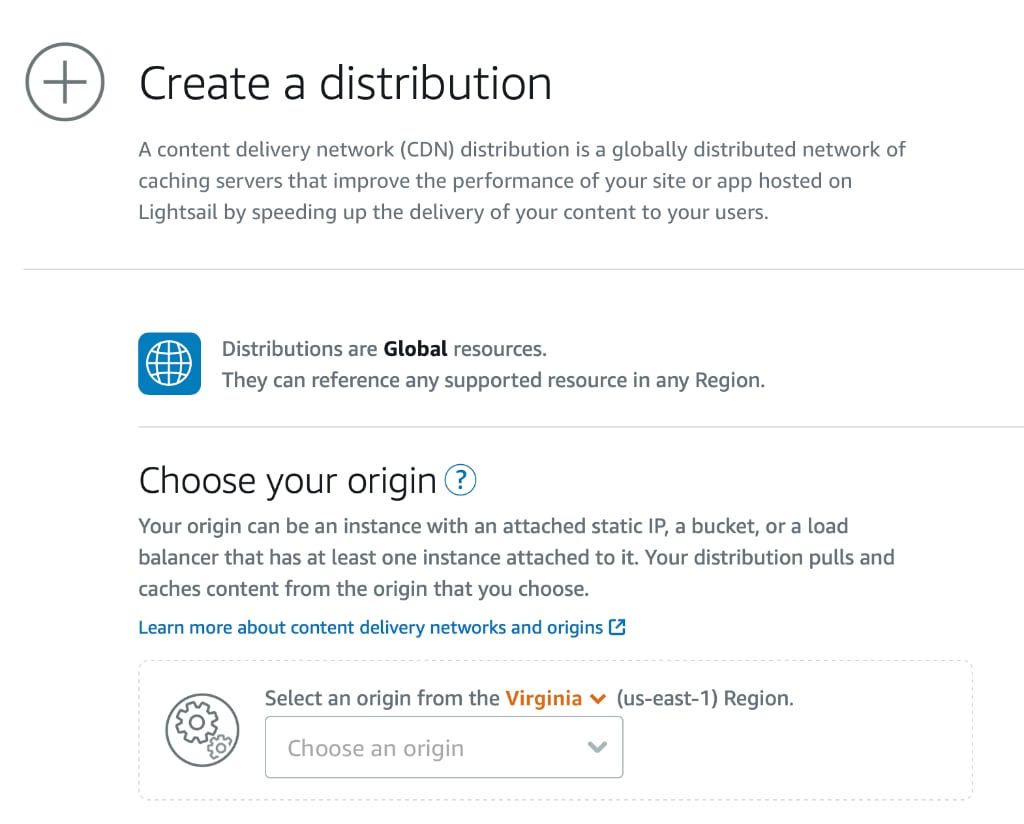
Choose the bucket created in first step as a source for this distribution. After that you should select the plan which you would like for the distribution. For anyone starting the podcast the first plan should be good enough.
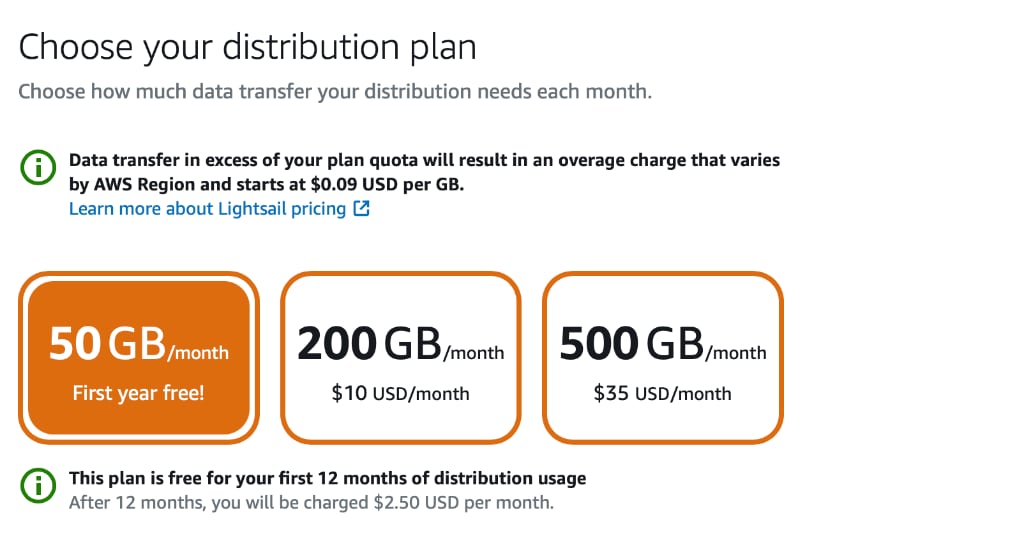
The 50GB plan is also free for first year which means you will not pay anything for bucket storage and distribution for the first year.
Now, give a name to this distribution and create the distribution. Once this distribution is setup, you should be able to access your audio files with the distribution URL.
Custom Domain Name Setup
Though you can access the audio files with the distribution URL, the better practice is to setup a custom domain for your files – podcast.domain.com or media.domain.com.
You need to create an SSL certificate before you can setup a custom domain for your distribution. Go to your distribution and click on Custom Domain tab. Under that look for Certificates and click on Create Certificate.
Decide on the custom domain you want to use and enter that domain name. You can enter the www or non-www version as an alternate name also if you want to secure that also.
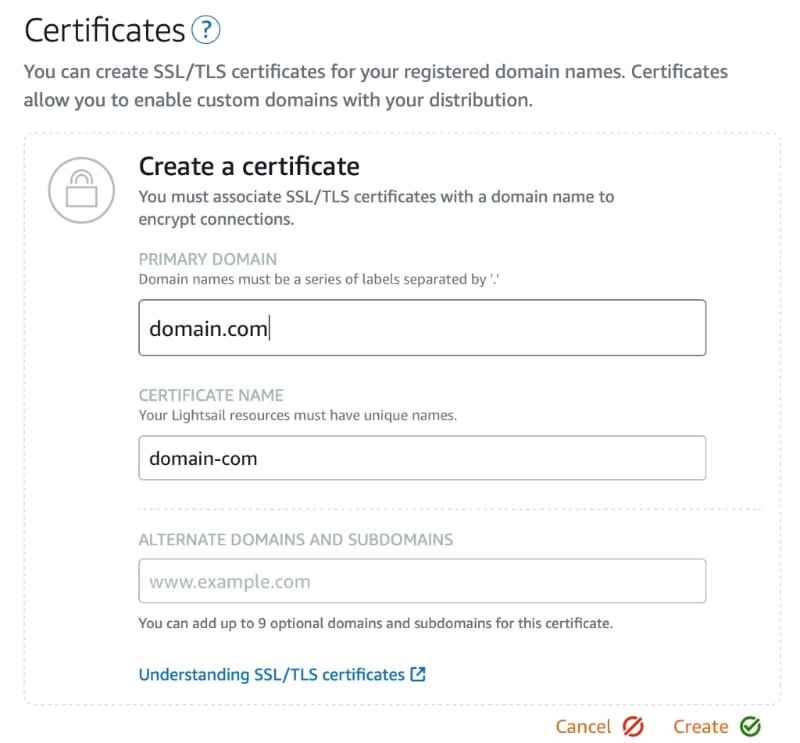
Click on create and it will start the validation process. To validate these custom domains, it will give you CNAME records which you need to add into your DNS setup.
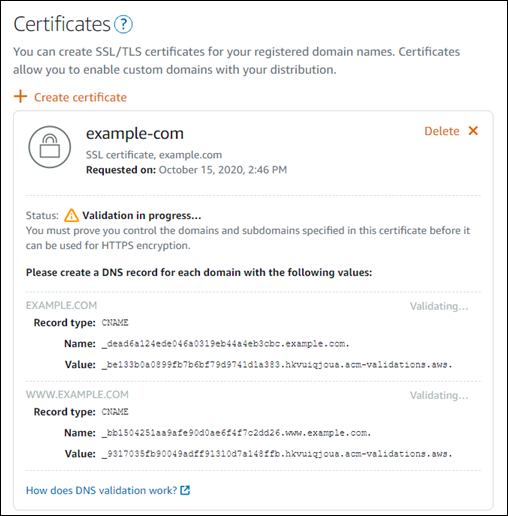
Once the CNAME is added, it will validate and create the SSL certificate for your custom domains. Now you can go ahead and enable the custom domain for your distribution which will use this certificate to serve the content over SSL.
Update DNS and WordPress
Now you have a custom domain name which can be used to serve your media files, you need to add a DNS record which points to distribution.
Create a new CNAME record for your custom domain which will point to distribution URL. The URL will be available in your AWS LightSail distribution management screen.

If you want www or non-www URL also to point the same distribution, make sure you have CNAME record for that also.
Once the CNAME is processed you can access your media files with the new URL. Below is a sample URL –
https://audio.example.com/file-name-with-extensionYou can use this URL to add the media files to your WordPress post and setup Podcast on your site. The media file will be distributed with CloudFront CDN distribution so will be easily available across the world.
You can even customize your setup to host multiple Podcast in the same bucket. Create folder for each podcast and save the media file under that folder. this was you can host multiple podcasts on a single bucket.
So, this is how you can easily setup Podcast Hosting on AWS LightSail. The first-year hosting will be free if you use the starting stacks. Even after a year this setup will only cost you $3.50 which is cheaper than many other hosting services.


