If you are using AWS LightSail to host your WordPress websites, there may be times when you want to upgrade your server or tech stack to properly support the site. Here is a tutorial that can help you while upgrading your AWS LightSail server.
AWS LightSail is a good offering for webmasters because of its pricing structure and AWS infrastructure. I have hosted many blogs on AWS LightSail and installed WordPress on them.
Time and time again we will need to update the server to manage the load correctly. If you are planning to upgrade your AWS Server or update the tech-stack, here is how you can do it.
Table Of Contents
AWS LightSail Server Upgrade
AWS LightSail comes with Bitnami WordPress Stack to easily install the WordPress on its server. Bitnami stack is a pre-configured end to end installer which contains everything a webmaster needs to run the WordPress.
You can update WordPress or install plugins, themes like any other hosting on the Bitnami installs. The problem comes when you have to update or upgrade your LightSail Server.
Though you can move to a bigger server easily, upgrading tech stack components are not that straight forward. Here we will take a look at how to upgrade your LightSail Server in both the cases.

Join AWS LightSail Facebook Group
Connect with like minded people and help each other manage AWS LightSail WordPress installs.
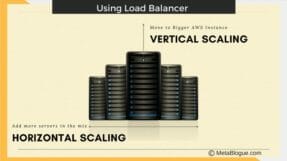
Move Your Site To Bigger AWS Server Instance
If you want to move your site to a higher plan on AWS LightSail, then you can easily do it. It’s just a matter of moving the current snapshot to a larger instance.
If you have followed our guide and have created a static IP address for your site, then the only work needed to create a new server instance and attach that to your static IP address.
Create a Snapshot
The easiest way to create a backup for your AWS LightSail server is by creating Snapshot. You can easily create the snapshots from your instance management panel.
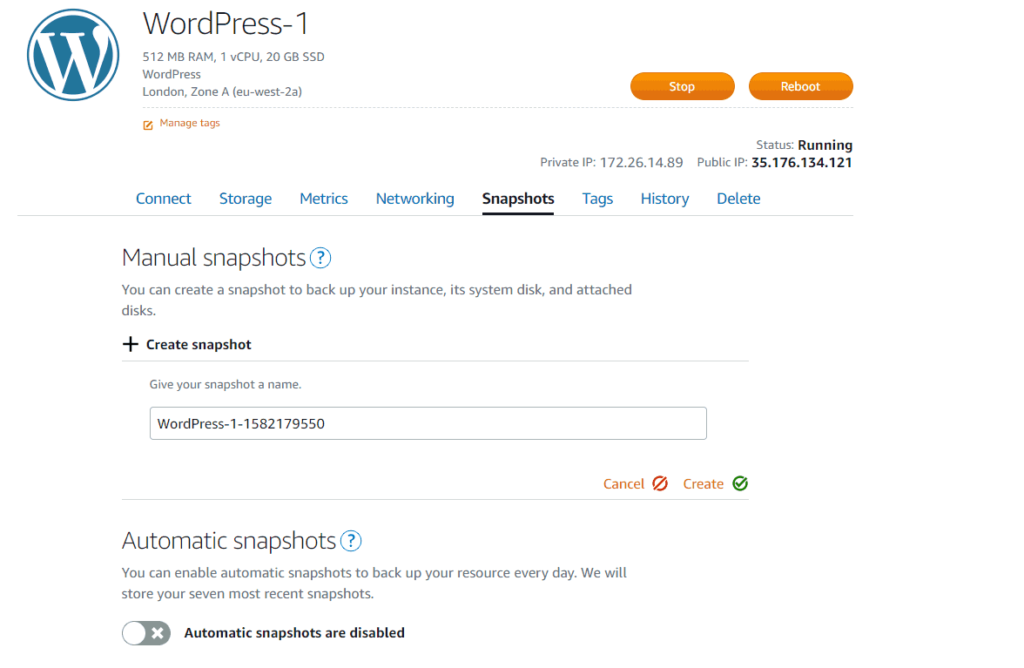
Go to the LightSail instance management screen and click on Create Snapshot button to create a snapshot for your server. Give it a name and click on Create.
You need to wait till the snapshot creation is finished before you can create your new server instance. Depending on your server size, it might take some time.
Create An Instance From Snapshot
Once you have the snapshot created, you can create a new instance from that snapshot.
To create a new instance, you can go to the Snapshot tab on the LightSail dashboard. It will list all the available snapshots and you can click on the 3-dot menu in front of your snapshot to create a new instance.
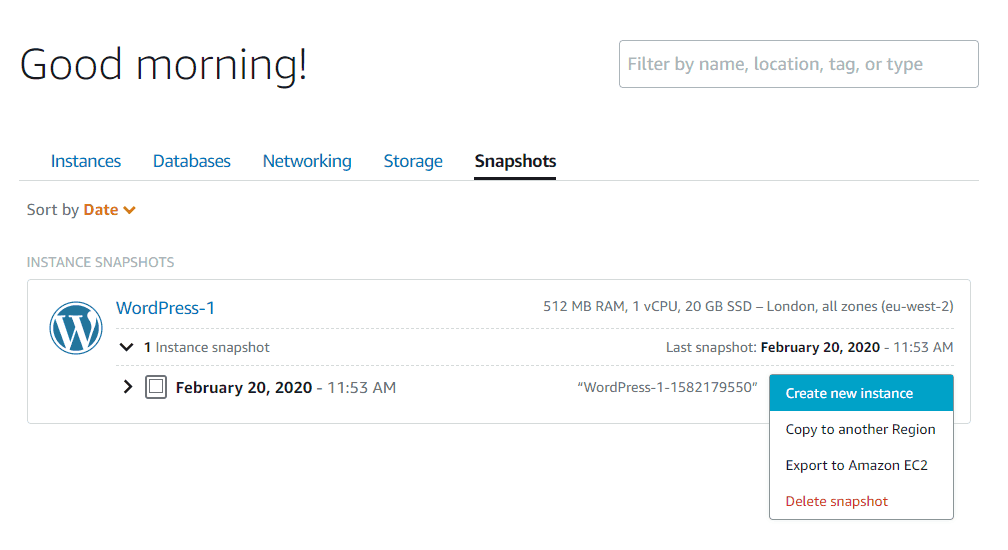
While creating a new instance, select the new instance plan which is required for your site.
Keep in mind that going to a bigger plan is allowed but you can’t select the lower plan as snapshots are a complete image of your server. So an 80GB data can’t be pushed on 20GB SSD. To downgrade, you need to follow the second method which we will discuss below in this post.
So, select your location, instance plan, and give it name to create a new instance. Once done, go to your static IP and edit it to point to a new instance rather than the old instance.
To finally clean up, you can delete the old instance and snapshot. That’s it, you have an upgraded server with more resources for your site now.
How To Upgrade The Server Tech Stack
There will be times when you would like to upgrade the tech stack on which your site is running. For Example, you want to move your site to a new PHP version to take advantage of the recently released features.
This process is not as straight forward as upgrading the server instance. As Bitnami comes as a complete image, the only way to upgrade the server component is to move your site to a new Bitnami image. This means that you have to create a new server instance and manually move the site content to the new server.
You can use any WordPress Migration Plugins to move your site to a new AWS LightSail Server.
I prefer using Jetpack Backup Solution as it’s easily integrated with WordPress and serves the purpose with minimal cost. But if you prefer any other solution, you can use that also. You just need to have the backup file at your disposal to move the site.
Create A New AWS LightSail Instance
To start the process of migrating your WordPress site, create the server instance on which you want to move your site.
This instance can be any plan as long as it has enough space to hold the content of your site. So, you can use this method to not only upgrade the tech stack but also to downgrade the server instance.
So just select the plan and create the instance. If you are using any tags to manage the billings, make sure you assigned that tag to the new instance also.
Upload the Backup File
VaultPress has the capability to automatically restore the site from the backup dashboard. This does not work with Bitnami images as Bitnami restricts the remote SSH access on its servers.
So, you need to manually download the backup file and upload it to your new server instance. You can upload it to your home directory at /home/Bitnami.
Note: Below commands assume that the backup file is upload at the default location. If you have uploaded it into a different folder, please correct the path of the backup files in the below commands.
Restore Content
Now you have a new server instance with the backup file loaded in the default directory. We need to restore the WordPress content folder and Database to restore the site.
The first thing is to unpack the backup file. Most of the backup files are archived and you can unpack it with the below command.
mkdir ~/wordpress-backup && tar xvf BACKUP-FILE-NAME -C ~/wordpress-backupJust replace the BACKUP-FILE-NAME with the actual backup file name and you will have the content unpacked at ~/wordpress-backup.
Now go ahead and remove the existing wp-content folder for the WordPress site. It’s a new instance so we can decide to delete the instance, if you prefer taking a backup, consider using the move command rather then remove.
rm -R apps/wordpress/htdocs/wp-contentNow, we need to restore the wp-content folder from the backup to the WordPress install.
sudo cp -rf ~/wordpress-backup/wp-content apps/wordpress/htdocs/wp-contentWe need to correct the permissions of the content folder which you can do with the below commands.
sudo find apps/wordpress/htdocs/wp-content/ -type d -exec chmod 0775 {} \;
sudo find apps/wordpress/htdocs/wp-content/ -type f -exec chmod 0664 {} \;
sudo chown -R bitnami:daemon apps/wordpress/htdocs/wp-content/
Once done, you have the content loaded on to the new install. If you have any other folder where you are storing specific files, you need to restore those folders also. Please use similar commands and restore those files from the backup.
Restore Database
Once you have restored the files, the next thing is to restore the Database. First thing, we need to set a few SQL Modes so that while loading we will not get errors for date format. Use the below command to enable those modes.
mysql -u root -p -e "SET GLOBAL sql_mode = 'ONLY_FULL_GROUP_BY,ERROR_FOR_DIVISION_BY_ZERO,NO_ENGINE_SUBSTITUTION';"Once you enter the command, it will ask for the password. Enter the Database password for the new instance and your database will be ready to restore the backup. You can use the below command to restore the database.
find ~/wordpress-backup/sql/ -name '*.sql' | awk '{ print "source",$0 }' | mysql --user="root" --password="DATABASE-PASSWORD" bitnami_wordpressJust replace the DATABASE-PASSWORD with the actual password and your database will be restored with the backup.
Restore Server Optimisations
The above steps will make sure that your Database and Content are loaded properly. You can check your site by going to your instance address. It should load correctly.
If you are comfortable with the site structure, you can replace the attached instance in your Static IP address and point it to a new instance.
Now, you have to enable the server optimization to the new instance like HTTPS LetsEncrypt Certificate or HTTP2 Support. If you have done some specific changes to your old server, you need to apply them again on the new server.
Once done, your site will be set to serve from the new Bitnami image.
So this is how you can upgrade the server or upgrade the tech stack on the server. If you are facing any specific issue, let me know in the comments and I can try to help.


Hi Sanjeev !
I updated my website PHP version by creating new instance and then uploading the old imported backup to the new instance. After that I replaced the attached instance in Static IP address and pointed it to a new instance. The static IP had already SSL installed on it so I didn’t configured LetsEncrypt. Now the issue is that on the new instance half the permalinks are broken and they appear like this for e.g “http://ip-address//abc/xyz/”.
What I’ve done wrong that is causing half permalinks broken & what steps now I need to do to fix these permalinks ?
Thanks & regards.
Hi Sohaib,
Try to save the permanent link structure in Settings -> Permalinks. Sometime WordPress can create issues which can be easily resolved by clicking the save again. Also since its using the IP address, make sure wp-config file is updated with the correct domain name. You can also use Better search plugin to change the ‘http://ip-address’ to ‘http://domainname’
– Sanjeev
after moving delete my old instance?
Yes, Once you make sure that the site is working properly with the new instance, you can delete the old instance. I would stop the old instance and will keep it a day before permanently deleting it.