If you are looking to optimize WordPress install on Plesk Server, you should be looking to enable object cache mechanism on your server. Here is how you can install Redis Server to enable Object Cache for your WordPress site and reduce the loading time of your site.

Earlier I have talked about how you can easily install WordPress with Plesk on AWS LightSail server. Though Plesk allows you to install three domains for free with AWS LightSail and comes with basic settings, it doesn’t have object cache installed by default.
It provides all the provisions to install and run object caches on the server. So, you can easily configure the caching mechanism and speed up your WordPress installs.
Which Object Cache System To Use With WordPress?
Mostly there are two different object caching mechanism which will work good with WordPress – Redis and Memcached. Though both are in-memory data storage and provide object caching, Redis Server is gaining a lot of popularity because of wide verity of use cases.
Redis Server is an open source in memory data caching mechanism which can be installed on Plesk server. Memcached can sometime be bit CPU hungry and may need more specialize skills.
So, we will go ahead and use Redis data storage for object caching With WordPress on your Plesk Server.

Join AWS LightSail Facebook Group
Connect with like minded people and help each other manage AWS LightSail WordPress installs.
Install Redis Object Cache For WordPress
Plesk comes with Redis object cache support but no Redis server installed. So, to enable object caching, you need to install Redis server and connect it with your WordPress installs.
Install Redis Server
There are two separate ways you can install Redis server on Plesk – Docker Container vs Base Server install. My preferred method is base server install as you will be using it with all your applications on Plesk.
To install the Redis server, you need to connect to AWS LightSail server through SSH.
Let’s first update the server with the below commands
sudo apt update
sudo apt upgrade
sudo apt autoclean
Once the server is updated, you can install the Redis server with the below command.
sudo apt install redis-serverOnce the setup is complete you will have Redis server installed and running on your server. To check that Redis server is installed, you can use the below command.
redis-cli pingThe service should return “Pong” as the answer to the above command.
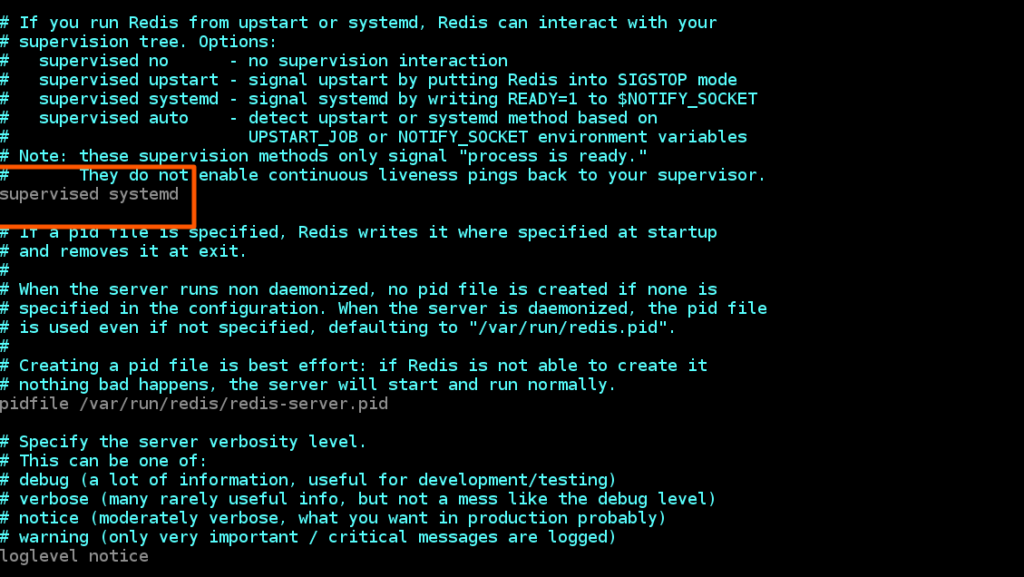
Once the service is installed you need to make sure your systemd init has access to be able to start service at each restart. You can do that in the redis.conf file. I prefer using the vi editor, but you can edit this file in any preferred text editor.
sudo vi /etc/redis/redis.confHere you need to look for a supervised statement. By default, the Redis server sets the supervised state to NO, you need to change it to systemd.

Once done, you can restart the Redis service or reboot the server to make this in effect.
sudo systemctl restart redisRedis server runs at localhost (127.0.0.1) on a 6379 Port by default. If you are using that port for something else, you may want to adjust the Redis port.
Since AWS LightSail blocks most of the ports for public access, this Port is also blocked by default. Which means, your Redis install can only be accessed by internal application and is secured from public access.
If you want more security, you can set a password for Redis server access in redis.conf file. It can be set with ‘requirepass’ parameter but if you are only one using the server, you can leave it as default.
Enable Redis PHP Extension
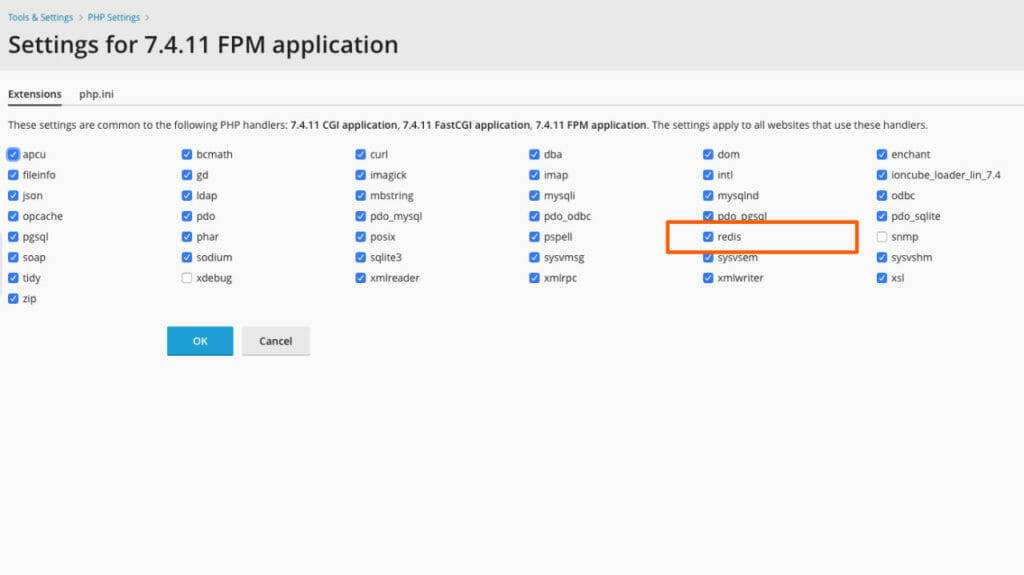
Plesk comes with Redis PHP extension installed; you just need to make sure that it is active in the PHP version you are using.
To check or enable the PHP extension, you can go to Tools & Settings -> PHP Settings on your Plesk dashboard.

Click on the PHP version your WordPress installation is using and make sure Redis extension is enabled. If not, please click on the checkmark and click OK.
Once done, you will have Redis extension activate for your PHP installation.
Connect WordPress To Redis Object Cache
Now, everything else is working, it’s time to enable Redis object cache in the WordPress. There are few different WordPress plugins which is available for Redis Object Caching in the WordPress repository. We will use Redis Object Cache Plugin to enable the Redis caching for WordPress.
If you are running the Redis Server with default parameter, the plugin will be able to connect automatically as it also uses the default parameters to look for Redis installation.
You need to create a default cache key for Redis Object Cache. You can do that by adding the below like in your wp-config.php file. Just add it at the top of the file after PHP tag.
define('WP_CACHE_KEY_SALT', ‘anyUniqueString’); //Added for Redis CacheChange the key string to anything unique for your system. Each WordPress install needs a unique key, so make sure you are using a good naming convention for the cache key.
If you have enabled the password for Redis server, you need to add that also in the wp-config.php file.
define('WP_REDIS_PASSWORD','redisPassword'); //Redis Server PasswordInstall Redis Object Cache
Now, you can go ahead and install the caching plugin from WordPress repository. The basic caching is available free of cost and should be good for most of the sites.
Once installed, click Activate and the plugin should automatically detect the Redis installation to enable Object Caching.
If you have followed the Plesk hardening guidelines, your WordPress install might have disabled the WordPress filesystem API. In that case, the plugin will give an error that Dropin not installed. If you are getting that error, you need to manually copy the object-cache.php file from the /plugins/redis-cache/includes/ directory to the /wp-content/ directory.
Once copied, the plugin will enable the object caching automatically. You also need to keep an eye while updating the plugin as the dropin will not be copy again with the updates. Plugin will let you know if dropin is outdated and you can go ahead to copy it once again.
So, that’s it. You now have a WordPress install using Redis Object Caching and can check the loading time on Pingdom Speed Test.


![[Review] StackPath CDN – Deliver Your Content Faster and Cheaper](https://metablogue.com/wp-content/uploads/2019/09/stackpath-cdn-services-review-for-wordpress-287x161.jpg)


