AWS LightSail WordPress machine does not come with an email server. So, you can’t send an email on the AWS LightSail server by default. Here is how you can configure Email on AWS LightSail WordPress Server.

Last time, when I talked about installing WordPress on AWS LightSail, I mentioned that we do have to set up our own emails. AWS LightSail doesn’t come with an email server, but it does come with a plugin called WP-Mail-SMTP.
You can use any SMTP provider and add it to your WordPress install to get the email service working. This is a workaround as the emails will be going from the provider email domain.
For this blog, Initially, I created a Gmail account and added it as an SMTP provider, which was handling all the emails. But I would like those emails to go from metablogue.com rather than gmail.com but that was not the case.
Why Emails Should Be From Domain Name?
You can keep using the general solution but there are problems with it. First, emails for MetaBlogue coming from a Gmail address sounds like spam and many receiving servers will treat it like that.
Even Gmail doesn’t like sending too many automated emails. So, if your WordPress installation sending too many emails in an abbreviated time, Gmail will block them.
The other option is to install an SMTP server on the AWS LightSail instance and use that for email service like Sendmail. But that uses the same IP address as your blog, and it can become tricky in case some receivers are identifying your email as spam.
They might block the IP address and it can create an issue for your blog, so it’s better to keep those things separate.
There are three type of email services which any blog needs.
– WordPress Transactional Emails
– Email ID with WordPress Domain for Regular Communications
– Email Marketing Service for Blog Subscriptions

Join AWS LightSail Facebook Group
Connect with like minded people and help each other manage AWS LightSail WordPress installs.
My Email Service Setup
I am using AWS SES (Simple Email Service) for sending transactional emails on AWS LightSail. Along with that, I am using Microsoft 365 for Domain emails and MailChimp for my email subscriptions.
Now it does sound a lot but thinks about it, Email Subscriptions usually are managed by the third party. So, we will end up using MailChimp or any other provider anyway.
AWS SES is a preferred solution in terms of cost of sending emails but if you are running an e-commerce site and want more control over the look and feel of your emails, I have added few additional options which can be used.
Now, let’s look at it one by one. There are few good options to send an email out, but I decided to go with AWS SES.
AWS SES Setup with LightSail
AWS SES (Simple Email Service) is an email sending service that can be integrated with LightSail. It gives 62000 per month free emails if you are sending them from EC2 instance.
Even though SES free limit does not apply to LightSail instances, the charges are very reasonable, and you will only pay as per your use. AWS charges $0.10 per thousand emails and $0.12 per GB of data out, which comes out very reasonable.

The setup process for SES is also extremely easy, you need to verify domain or email and setup WordPress to use SES. I would prefer to verify the domain so that you will not have any restriction on the email address.
How To Verify Domain
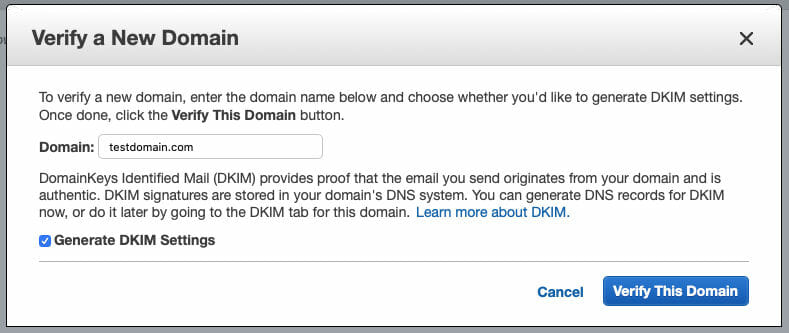
- Go to Amazon AWS SES Service.
- Add your domain to SES for Verification. Check the box to generate DKIM Keys.
- SES will provide some DNS records; you need to add them to your DNS server.
- SES will give you DKIM (Domain Key Identified Mail) and SPF (Sender Policy Framework) records. I would recommend adding all of them to the DNS server.
- You can skip the MX record as we are not expecting to receive emails at SES.
- Once all the records are added and propagated, SES will verify your domain.
Remove SES Sending Limit
By default, SES will add your account to a sandbox, and you will not be allowed to send emails to everyone. You can only send it to the verified domain or email address, you need to raise a service request to remove that limit.
So, go to AWS Support Center and create a new case.
You can choose the category as “SES Sending Limit” and case type as “Service Limit”. Select the subject as “Limit Increase: SES Sending Limits”, provide additional detail, and submit the support ticket.
AWS support team usually takes a day or two to review and approve the SES email sending limit increase.
Connect WordPress On LightSail to SES
Now you need to connect SES with your WordPress installation on LightSail. To do that you can install a plugin called WP SES, which can move the emails function for WordPress to SES.
After installation of WP SES, you can set up the sender email and other settings for it.
You will need the API key and Secret Key for the AWS account to enable the email access.
Create AWS Secret Key
I prefer creating a user and attaching it with SES permissions. You can do that in AWS console with IAM.
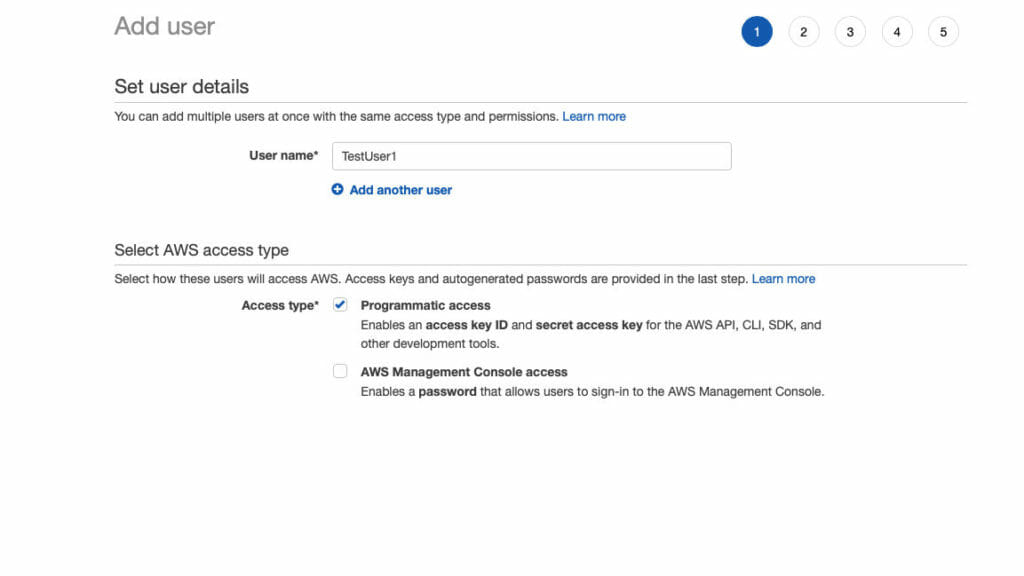
- Create a new user and give it a name.
- Select Programmatic access in Access Type as we are not expecting this user to physically log in.
- While giving permissions add existing policies AmazonSESFullAccess to that user.
- Take note of Access Key and Secret Key.
Once you have those keys, enter it on WP SES settings and send a test email to verified email-id. If you receive the email, then everything is set up correctly.
Once your service request on AWS is complete and your SES account has been moved out of the sandbox, you can enable the WP SES in production. This will replace all the wp_email calls with SES email calls and will start sending all the WordPress emails through SES.
SendInBlue SMTP
AWS SES is one of the cost-effective solutions but does not render much control on the looks of the emails. If you are running an e-commerce site, you may want to format your emails so that the user can get the required information.
SendInBlue SMTP is another solution that you can use to send your transactional emails from WordPress. SendInBlue usually used for a marketing campaign but they also offer free transactional emails with limits.
You can go to SendInBlue to create a new account. Once you have created a new account and verified your email address, you can select between Marketing Campaign or Transactional Emails.
Most of the time, transactional emails are already active, and you can just enter the SMTP setting in WP-Mail-SMTP. They have their own WordPress plugin, but I only advise using it in case you are using it for Marketing Campaign also.
If you see a message that transactional emails are not active, then drop an email to their support. You need to let them know what kind of transactional emails you will be sending, and they will activate it for you.
Now all emails going through WordPress will use the SendInBlue email server. They usually allow three hundred transactional emails per day in their free account, if you need more than that, you can upgrade the plan.
You also need to add the DKIM records to your DNS provider or you can add additional SendInBlue DNS server in your configuration.
They have Transactional email templates which can be edited to give the desired look.
Receiving Emails On AWS LightSail
It’s never good to send an email out from an email address that can’t receive emails. If someone decides to reply to your email, you won’t be able to receive it.
There are two ways you can receive the emails, through Email Forwarders or Business Email Services.
Though Email Forwarders can enable the email receiving capability for free, they do not provide you the capability to send emails from your email IDs. So, if you respond to the emails, you would still be using the Gmail domain name.
You should have the capability to communicate with your domain email ID. It builds trust between the parties and the other party knows that they are talking to the correct person. Also, there are certain affiliate networks and services which ask for official email ID as ownership proof.
I use Microsoft 365 to receive my domain emails and found it to be one of the cheapest and reliable service.
Microsoft 365 Business Basic
For the normal email service to be enabled, Microsoft 365 Basic is a sufficient plan.
Microsoft 365 Business Basic plan costs around $5/PM and gives 50GB Mailbox, 1-primary email address with 400 Email Alias, Office Apps (Word, Excel, and Powerpoint) Cloud Version, Microsoft Teams Video Conferencing Service, and 1TB Onedrive Storage.
If you try to use any other email service provider, you will end up spending a similar amount. But with Microsoft 365, you are getting so many value-added things which makes it easy to run your business.
Microsoft 365 Limited Sale
Microsoft 365 currently running a limited time sale where a user can get the first 6 months of subscription free of cost when they commit for a year. You don’t have to pay anything; the first 6 months are free, and billing will start from 7th month onwards. This is effectively 50% off on the one-year pricing.
How To Setup Microsoft 365 Emails
Microsoft 365 offers different Business plans which you can select based on your requirements. If you are only looking to use the service for enabling email access for your domain, their Basic plan is sufficient.
With the Microsoft 365 Basic plan, you get one email ID which can be pointed to your domain.
To start with, you need to sign up for the Microsoft 365 Business Basic service.
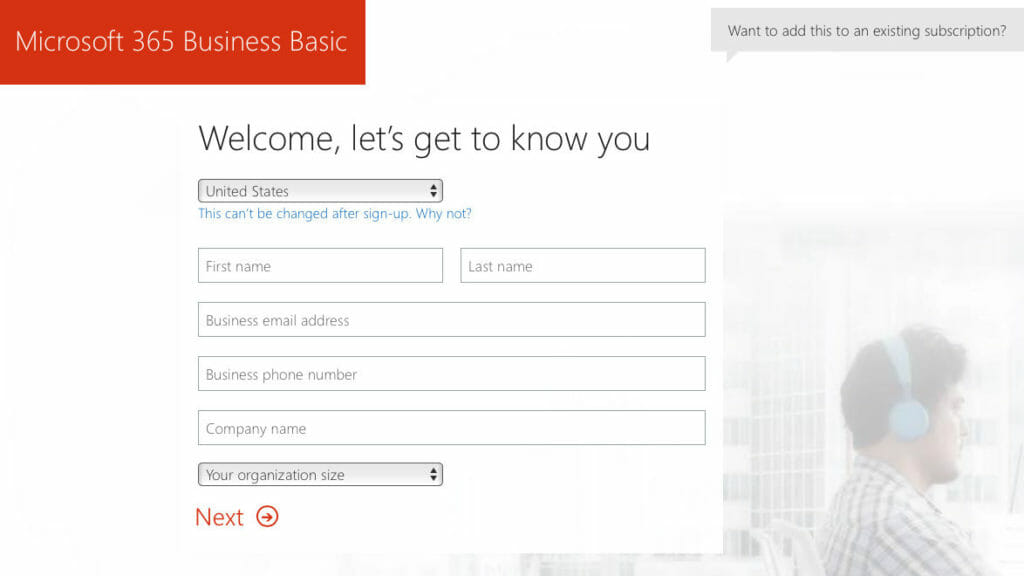
It will ask for general information like your email ID, phone number, etc.
This email ID is different than the official email ID for your domain. This will be used for communication purposes, so please use your existing email address for this. Your domain email address will be different.
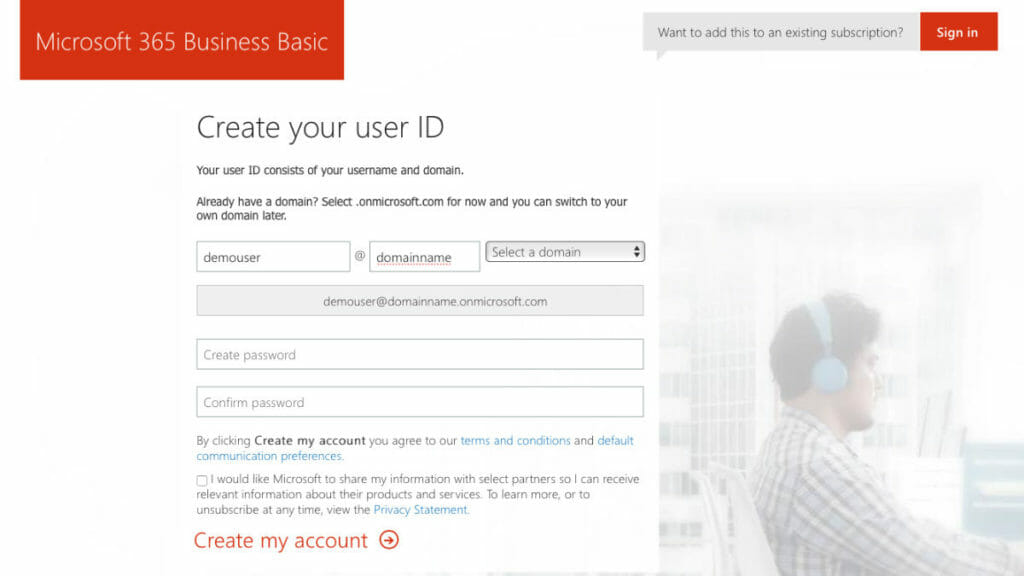
On the next screen, you need to create the domain email ID. Microsoft allows you to purchase the domain right there if you don’t own it.
If you already own the domain, just enter the domain name in the text box and select onmicrosoft.com from the dropbox.
At this time, Microsoft doesn’t know if you own the domain, so it will not create the domain email ID. It will create an email ID ending with – DOMAINNAME.onmicrosoft.com.
Don’t worry about it, we can change it later after setting up the domain correctly.
Verify Domain
Once your account is created, you need to add the domain to Microsoft 365 account.
Go to your admin panel and select Settings -> Domains. Click on Add A Domain.
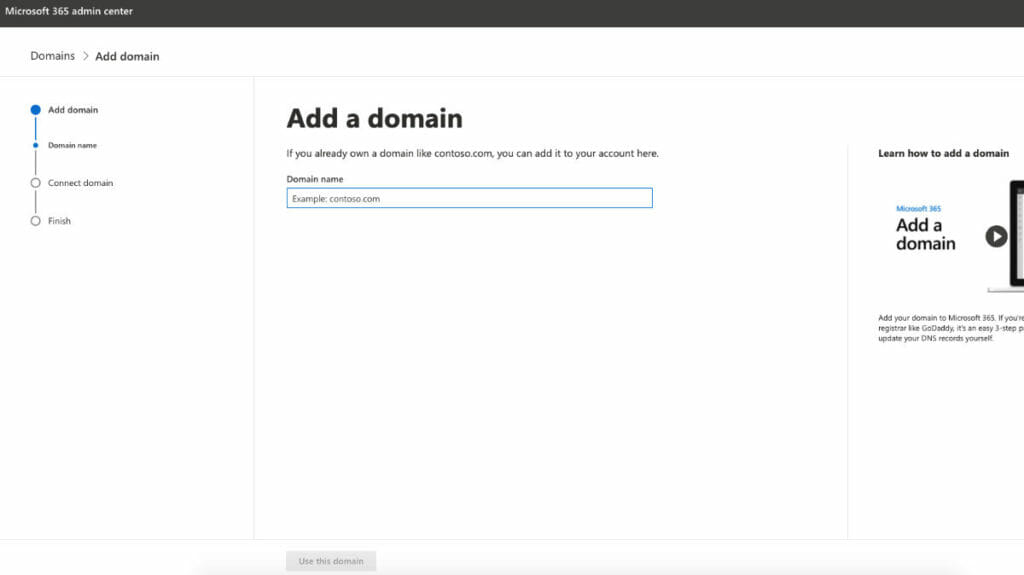
Give your domain name and click on Use This Domain button. It will give you a TXT record that needs to be added to your DNS server.
Once the DNS record is added, you can click on Verify to prove the ownership of the domain. Depending on the DNS server, it might take some time to propagate the DNS record. You can close and come back to the screen again to start the verification.
Along with the TXT record, Microsoft needs some additional DNS records to function all its services. I would suggest adding those records also right away so that they can also get propagated properly.
Here are DNS records needed for Microsoft and how you can add them to Google Domains server. If you are using any other DNS server, please add them accordingly. Without setting these DNS names some of the services like Email, Skype will not work properly for your domain.
Update Username
Once your domain is verified, you can update your username to point to a domain rather than onmicrosoft.com.
Go to Users and Edit Username.
This time you will get the verified domain from the dropdown list. Select it and your username will be changed to your domain name email ID. You can now receive and send the emails from that ID.
If you want more than one email ID for your site, you can create the email alias for your username. Microsoft 365 allows up to 400 email aliases for a user ID and you will start receiving the emails for all the email alias you have created.
Email Forwarder
Most of the domain name provider give email forwarding service with domain name purchase. I use Namecheap for most of my domain name purchase and they allow to create 100 email address with forwarding enabled.
This means, I can have up to 100 email address on my domain and the emails coming for them will be forwarded accordingly. The only thing you need to make sure is that MX records are setup correctly.
You can create a Gmail address and set up email forwarding for your domain email address. This way even if someone wants to reply to the email, you will still receive it.
The only drawback here is you will not be able to reply with the same email address. You need to use the Gmail address to reply any messages.
If you are using the AWS route 53 DNS service, you need to add the MX record. Just create new records and add the value given by your domain provider, which will create the email forward.
My preferred way is to use Microsoft 365 to handle the domain email service as it provides a good toolset to manage the sites. But if you want to save money at the start of the blog, go ahead and use Email Forwarders.
This way you have a service to send an email out and receive emails. Both services can be configured to use any SMTP client.
If you are using LightSail, how are you setting up your email service? Let us know in the comments.


![[Genesis] How To Add Social Media Icons To Author Box](https://metablogue.com/wp-content/uploads/sites/3/2018/01/author-box-after-modifications-287x161.png)


Thank you for both this post and the one on enabling the Let’s Encrypt SSL certificate. For my site in Lightsail, I went with your suggestion to go with SendInBlue. So, the site hosted on Lightsail and the domain name/email is with GoDaddy. In SendInBlue, I set up an account for Lokananda Yoga (business name) with ‘info@lokanandayoga.com’. When people receive emails from our shop, the sender is Lokananda Yoga and the reply email goes to ‘info@lokanandayoga.org’ which is exactly what we wanted.
Thank you again!
Hi Cheryl,
I am glad that it worked out perfectly for you. SendInBlue is a good service to automate marketing campaigns along with sending these transactional emails.
Thanks,
Sanjeev
Thanks a lot, very helpfull.
Brilliant – I will be using SES alot on the future! Super easy to setup bro! 🙂
Glad It was useful!!
Hello.
I have some issues setting email forwarding on Namecheap, maybe you can help me.
I have my domain on Namecheap but I can’t create a forwarding on it because Namecheap only allow it with Basic or Premium DNS and I’m using a custom DNS that is pointing to Lightsail with some nameservers.
How can I create the forwarding without affecting nameservers of Lightsail?
Thanks in advance.
Hi Bemsson,
In case you are using custom nameservers, you need to add the Namecheap mail DNS records in your custom DNS. NameCheap should provide those records and you should be able to create it.
– Sanjeev
Hi,
I am using godaddy for domain, lightsail for hosting and and as per our suggestion, sendinblue for mail. tried using general email grom gmail.com.
on setup on wordpress, Ater entring and saving API key, when we test it, it gives error
There was a problem while sending the test email.
An issue was detected.
This means your test email was unable to be sent.
Typically this error is returned for one of the following reasons:
– Plugin settings are incorrect (wrong SMTP settings, invalid Mailer configuration, etc).
– Your web server is blocking the connection.
– Your host is rejecting the connection.
Can you help me in fixing this please
Gmail has some restrictions, you may have to check the account and set it to allow connection to less secure apps. Most of the time that should fix the issue.
Hi,
When I test a mail from Offload SES Lite, did work, but when I buy an order to test wordpress mail, did’nt work.
Do you know what can it be?
With the WP Mail log plugin I can saw the email sent, but they don’t reach the recipient
Hi Gabriel,
Mostly its the issue with the other plugins which you are using. Usually, all the emails which are using the WordPress mail system will be forwarded with this plugin. Also, check the From email address and make sure it has been whitelist in the SES account.
– Sanjeev
Sanjeev… what an amazing resource. You’re one of the only ones out there (that I can find) that’s trying to help more folks get up-to-speed w/Lightail… I’m very grateful for your tutorials!
I do need a little help…
I’ve managed to do the following:
• My domain is secure using a ‘Let’s Encrypt’ certificate
• My Domain has been verified
• I’ve requested and received confirmation my account has been moved out of the Amazon SES sandbox.
My problem is I cannot verify the email I want to receive everything my website sends (forms etc). I’m trying to verify an email that is not of the same domain name associated w/my dns zone. Is this possible? (Example: domain name is ‘bobscars.com’ but I want to be able to receive emails at ‘steve@stevescars.com’.) I thought if I was out of the SES sandbox that I should be able to move forward w/this.
When I try to verify my email I’m able to RECEIVE an email at the email I wish to use asking me to click a link and verify my email… when I do click the link I always receive a ‘ERR_SSL_PROTOCOL_ERROR’. It doesn’t matter what browser I try that in.
Any idea what I’m missing here? Thank you for any help!
Hi Kevin,
You do not need to verify the receive email address, if you are out of sandbox than you can send emails to any address. Once the domain is verified, you can create add any email address like ‘wordpress@domain.com’ in WP Offload SES settings. It uses that email address to send emails from.
By default, all the wordpress notification will be send to admin email address. So as long as you have correct email address defined in your admin account you should be fine. For contact forms, depends on plugins you are using, you need to define the to address in the form.
– Sanjeev
I’m still confused. I do NOT have email accounts for this domain… there will never be email accounts for this domain. I thought because I requested (and received) to be removed from the sandbox that I’d be able to forward forms to MY email address (not the same domain) AND send an autoresponder to the email address that signed up for our newsletter. I cannot get either to work for some reason… but thank you for the effort / reply! 🙂
AWS SES can only send emails from the verified domains or emails. If you have verified domain than it can send email from all email address of the domain. As long as you have setup DNS records for AWS SES, your emails for that domain is already ready. You can use any email address for that domain to send emails from WordPress.
Coming out of sendbox means you can send emails to any email address. So if you want to setup a form which should send an email to different domain, make sure that form is using a To address, where you want to send email.
The email will still go from the domain email but will reach the email mentioned in To address. Hope, this will make it clear.
Thank you Sanjeev for this helpful post.
I have a LAMP stack instance setup on my Lightsail, and my domain is from different domain provider. I need to have , say 7, email accounts on my domain name. And, receive emails on 1 from these 7 email accounts. I have a few questions if you could help.
You’ve mentioned that SES provides 62,000 emails from EC2 instance and that this SES free tier does not apply to Lightsail.
But here you are setting up WP instance on Lightsail. Then how can that free tier apply to this instance, since its on Lightsail?
Hi Yogesh,
To create 7 emails which gets forwarded to 1 email address needs to be setup on Domain Provider. Usually most of the Domain provider gives email forwarders for free. This way you can gets all of your emails on 1 email address.
SES is needed only if you want your LAMP stack to send emails out from any of those email address. It only charge for the emails send from the LAMP stack since receiving is done from domain forwarders.
SES is not free with LightSail, but the rates are very reasonable and only gets charged in the bundle of 1000 emails.
– Sanjeev
Thank You, Sanjeev.
I’ve bought the MS 365 Business Basic subscription as per your recommendation and I’ve created 7 email aliases. I’m able to send email in PHP using Authenticated SMTP method and my MS account credentials. However, I’m only able to send emails using my domain email which I use to login to my MS account. I need to be able to send email from my other email aliases too. I tried using the same credentials that I use for accessing my MS account and set ’email from’ property in phpmailer.
1) Do you have any idea if this is possible?
2) Am I correct in using my MS account credentials for SMTP authentication? Or does MS provide separate credentials for SMTP auth somewhere in its admin panel?
Hi Yogesh,
Have you set up Email Alias on Microsft 365 or email forwarders on Domain providers? Email Alias should be the way to go even though Microsoft suggests that you can only receive emails on email alias. They suggest using shared mailboxes in case you want to send emails out from other addresses.
I would advise against using the MS account credentials on the application. You can use the APP password to gain access to SMTP functionality. Please try to create email alias and setup SMTP as mentioned by you. Test the setting by sending emails out to any external email address. Don’t use Microsoft address as it will still show primary address.
I use a similar setup with email alias on Microsoft 365 but use AWS SES to send emails out from my application. Since the emails going out are less in number and most of my aliases are to receive emails, I almost pay few cents for the AWS SES.
– Sanjeev
Thank You, Sanjeev for being so helpful.
I have created 2 email alias and 5 shared mailboxes (after removing those 5 emails from alias list) so that I can see the incoming messages are on which email address. I did this since incoming mails on my main mailbox do not show which email address/alias the email was sent to. But I can see every shared mailbox is showing its own separate storage space of 50Gb. Is this shared mailbox chargeable (because I’ve created 5 of them)?
I was quite sure I should not use the MS account credentials for SMTP auth. But I could not find the APP password that you suggested to you. Can you direct me where can I find my APP password? It would be great if there are credentials only for SMTP Auth.
Hi Yogesh,
Shared mailbox does not need a licence till 50GB storage. If you want more storage, you need to assign a licence to that mailbox.
For the App Password, you need to go to your Microsoft accounts page. Under Security -> More Security Options -> App Password. For some reason, new password doesn’t work immediately, so create a new App Password, wait for 10 min before using that password.
– Sanjeev
Thank you, Sanjeev.
This is very confusing. I can’t find the options that you have mentioned. I went through the Microsoft support articles (ref: https://support.microsoft.com/en-in/help/12409/microsoft-account-app-passwords-and-two-step-verification). But when I click on ‘Security basics’ on this page, it shows a login screen but entering my email address but it says “That Microsoft account doesn’t exist. Enter a different account or get a new one.” in both cases.
Hi Yogesh,
I agree, the additional security settings are not easy to find. The easy way to go to your profile in active directory – https://account.activedirectory.windowsazure.com/r/#/profile. On the right side you will see a setting for Additional Security Verification. Click on that to get a new page where you can set Microsoft Authenticator app to protect your account and also can create app passwords.
– Sanjeev
Hi Sanjeev,
Thank you again for taking the efforts to help me out. Unfortunately, I still can’t find a way to create App Password. I visited the link provided by you, completed verification on the login screen that appeared after clicking the link. Also, added Microsoft Authenticator account.
Hi Yogesh,
Please check if you have enabled the App Password in Multi-Factor Authentication settings. Go To Microsoft Admin -> Users -> Active Users. You will see an option of Multi-Factor Authentication in the top bar, select that. In the new Screen you will see an option of Service Settings, click on that. First setting on that screen is App Password, make sure you have selected “Allow users to create app passwords to sign in to non-browser apps”. Once done, you can try the Additional security screen again for App passwords.
– Sanjeev
Hi Yogesh,
I have created a step by step guide on how to send WordPress emails using Microsoft 365. You can check it here – Send WordPress Emails With Microsoft 365 Account
Hello Sanjeev, I have a question, I added the Domain Verification Record, DKIM Record Set, Email Receiving Record config that AWS gives when you enable ses for sending emails, but now I bought a godaddy email account that I’d like to configure, godaddy gives me a different set of TXT, CNAME, MX, records, do I need to remove the ses/aws records? or is it fine if I only add the godaddy ones, without removing the others?
Hi Gibran, you have to pick and choose the records based on the service you want to use. If you want GoDaddy to receive emails, you can add the MX records. If you want the ability to send emails with Godaddy, then you need to add other records also. You can leave the AWS records as it is, you will need them to send emails from WordPress. Remember, we can have multiple services which can send emails but receiving emails should be done with one service.