If you are using Microsoft 365 subscription for your business emails and would like to use the same account for sending emails out of your WordPress install, here is how you can set it up.

In my earlier post I talked about how you can easily setup Microsoft 365 subscription to create domain email address. But while doing the setup I used AWS SES for sending emails out of WordPress which can also send emails from domain email address.
I have received questions regarding using the Microsoft 365 subscription to send emails out of WordPress. This way you don’t need to go through AWS SES approval process, and you would end up using the same service for all your work.
So, in this post I will talk about how you can setup Microsoft 365 to work with WordPress and send emails out to your customers.
Setup Microsoft 365 Email Service with WordPress
My preferred way to setup WordPress emails using Microsoft 365 is with the help of Shared Mailbox. Shared mailbox provides 50GB storage space and allows you to manage the mailbox separately.
If managing the mailbox separately is not a requirement, you can use the primary mailbox to send emails from WordPress. The requirement is same in case you need to setup your primary email address.
Enable SMTP Authentication for Your Users
Before we start setting up emails, we need to make sure that the users in your organization is allowed SMTP authentication. If your organization has accepted default security policies of Microsoft 365, SMTP authentication will not be allowed for any user.
Disable Security Default Policy
You need to disable the default security policies to make sure that your users can use SMTP authentications to send emails from WordPress.
- Sign into the Azure portal as a security administrator, Conditional Access administrator, or global administrator.
- Browse to Azure Active Directory > Properties.
- Select Manage security defaults.
- Set the Enable security defaults toggle to No.
- Select Save.
Once you have disabled the security defaults, you can enable the SMTP access for users so that they can configure the shared mailbox.
Enable SMTP Access
You need to enable the SMTP authentication for specific users. Even if you want to use the shared mailbox, you need to enable the SMTP access to the user who has the access to shared mailbox.
- Sign into Microsoft Admin Portal to enable SMTP authentication for the user you want to use.
- Browse to Users > Active Users
- Select the user and a popup menu will come up
- Go to Mail tab and click on Manage Email Apps
- Select Authenticated SMTP and Save Changes
Generate App Password
If you have enabled the multi-factor authentication you can’t use the user password to log into SMTP apps. You need to enable the App Password.

- Sign into Microsoft Admin Portal
- Browse to Users > Active Users
- Click on Multi-Factor Authentication
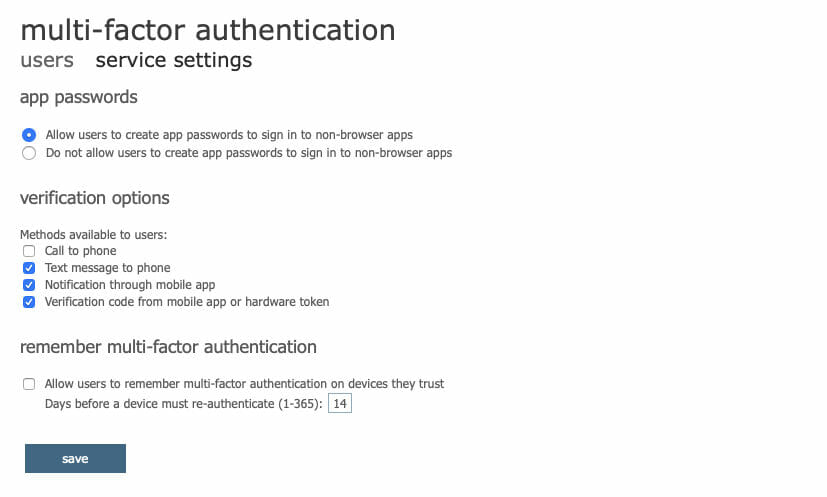
- Go to Service Settings
- Select Allow users to create app passwords to sign into non-browser apps
Once done, you can create app password to connect your WordPress site to Microsoft 365 email service. You can do that from Additional Security Page of your account.
- Sign into Additional Security Settings
- Go to App Passwords tab
- Click on Create Button and give a name to your App and click Next
- Copy the password shown on the screen.
This password will be shown only once so you need to save it. If you misplace the password, you can create another app password and use it.
Create Shared Mailbox
To start with shared mailbox setup, you need to create a shared mailbox with an email address. You can give it any email address like wordpress@your-domain.com.

- Sign into Microsoft Admin Portal
- Choose Admin Centers > Exchange.
- Browse to Recipients > Shared
- Click on the + icon to create a new shared mailbox
- Fill the email address, display name, and Select the user who will have access to this shared mailbox.
- Click on Save to create the shared mailbox
Setup WordPress SMTP Connection
Now we have all the things setup, including the shared email mailbox which we are going to use for sending the emails out of our WordPress site. We will user WP Mail SMTP WordPress Plugin to connect WordPress to Office 365.
So, go ahead and install the WP Mail SMTP plugin on your WordPress installs. The plugin has a pro version in case you need advanced features, but for the basic email settings, free version is enough.
Once installed, we can configure the Microsoft 365 account in the setting page.

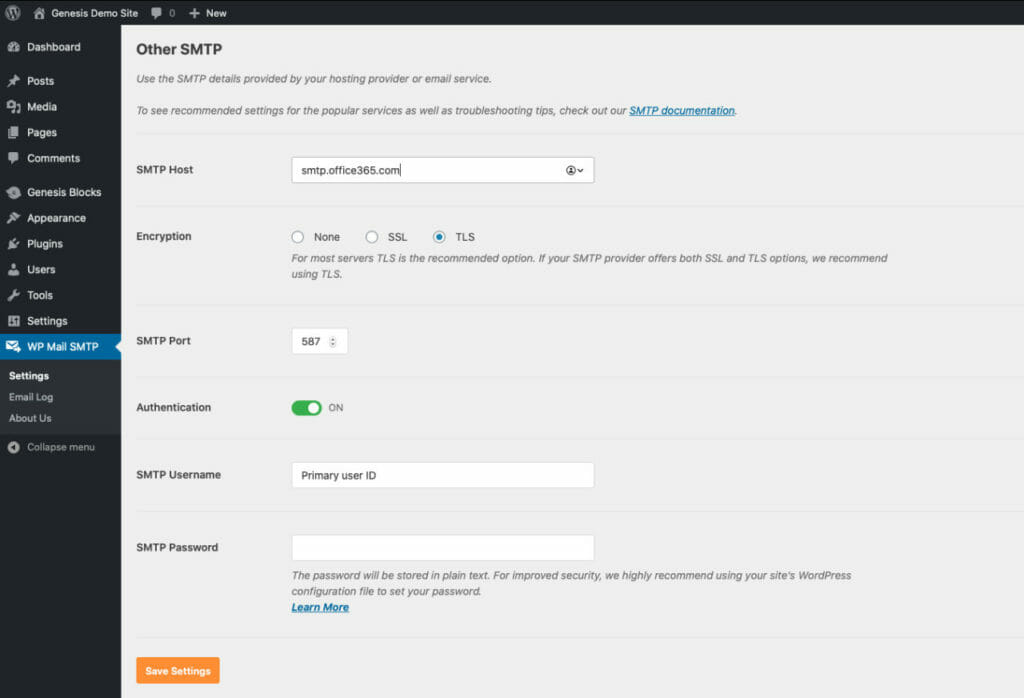
You need to enter below settings to make a SMTP connection and send WordPress emails from Microsoft account.
- From Email Address – Your Shared Mailbox Address
- Mailer – Select Other SMTP
- SMTP Host – smtp.office365.com
- SMTP Port – 587
- Encryption – TLS
- Authentication – Yes
- Username – Primary Email ID (Email ID which has access to shared mailbox)
- Password – App Password
Once all the settings are saved, you can go to Test Email tab and send a test email to any address. The email should go with the shared mailbox user ID and will be delivered to recipients.
Now all the emails from your WordPress will use the WP Mail SMTP connection and will go from your Microsoft 365 account.
If you are still facing issues while sending WordPress emails from Microsoft 365 account, let me know in the WordPress comments and I will see if I can provide any help.


Thank you for this perfect instruction! You really made my day 🙂
It didn’t work for me 🙁
The test e-mail didn’t work. It says:
There was a problem while sending the test email.
The only difference is that the account i’m using is an simple user, not an shared mailbox. Any ideas?
my bad, it is a shared mailbox as well
Hi: I have a question about the password. I am setting this up for someone using microsoft 365 mail. Is the password area in wp smtp the email password from the specific email account?
Yes, you need to create the App Password from that specific email account. If you are doing it for someone else, you can ask them to create an app password and give it to you.
– Sanjeev
Thank you! I’ve had so many issues with WordPress/Office 365 and this solved the issue! Perfection!
Dear Sanjeev, very useful how-to. Only thing that prevented on my website from sending emails was the option “HTML: ON” in the plugin Email Test tab. Once i disabled that, the email was sent.