AWS LightSail is the latest offering for the webmasters from Amazon AWS Services. Check how easily you can install and setup WordPress on AWS LightSail.
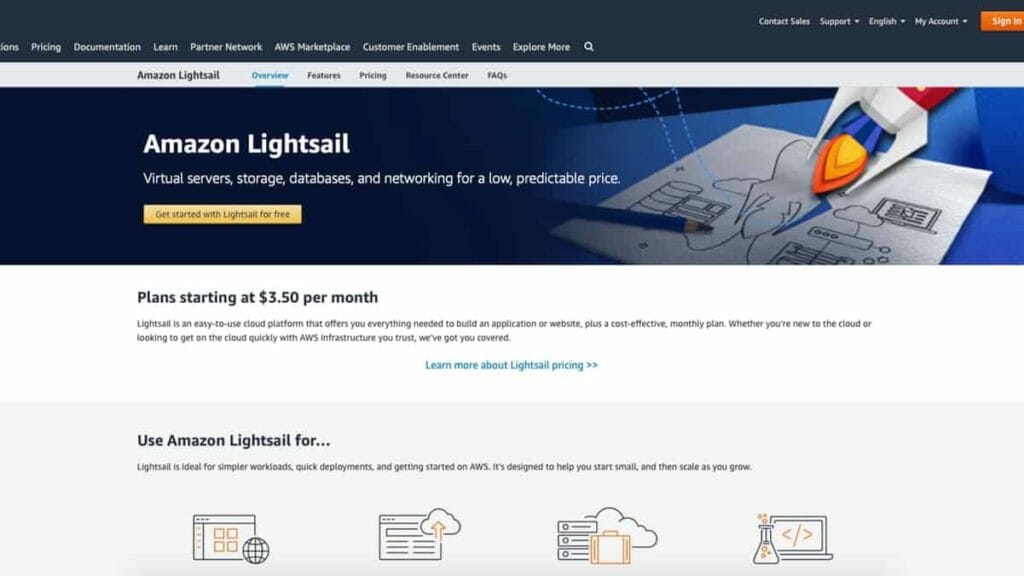
Amazon’s idea is to provide virtual private server (VPS) installations for small and medium businesses, so they don’t have to worry about anything other than building their applications.
Installing and running a WordPress was possible earlier on Amazon EC2 also, but many bloggers were skeptical about it.
Small blog owners look for fixed cost pricing but EC2 pricing is based on the usage. Most of the small blog owners are not ready for that kind of pricing, and not many have the technical skills to manage the EC2 installation.
Why AWS LightSail?
So let’s talk about why we should consider AWS Lightsail rather than other hosting solutions.
Most of the small websites and blogs run on shared hosting and anyone who has used shared hosting will know the pain associated with it.
You do not have control of those hosting, sometimes your site will be working fine and sometime it will be slow like hell. It depends on the other users who are sharing the resources with your site.
One bad user can ruin the experience for all the sites on that server, even otherwise the speeds for shared servers are not that great.
What AWS LightSail is offering is a virtual private server for small website owners with shared server pricing. There are some additional benefits on AWS LightSail which is not available on Shared hosting like Static IP Address, DNS Management, Backup, etc.
So rather than starting with a shared server and moving to VPS once your blog grows, start with a dedicated virtual private server.
You also get the AWS infrastructure, which will provide unparalleled performance. This blog is currently hosted on AWS Lightsail, you can check the performance to get an idea.
Here is a step by step guide to install and setup WordPress on AWS LightSail. Use the TOC to jump to specific sections of the guide.

Join AWS LightSail Facebook Group
Connect with like minded people and help each other manage AWS LightSail WordPress installs.
How to Install WordPress on LightSail
AWS LightSail WordPress installation is all automated and can be done in 5 minutes. AWS uses the Bitnami WordPress image to install and manage WordPress on AWS.
You need to create a server instance (click on Create Instance) and select the applications you need to install on that instance.
There are few things which you need to understand befog you start installing WordPress.
AWS has a lot of regions and some regions have different data transfer limits. AWS Lightsail will give the closest region based on your location but you can change it according to the target audience for your site.
Currently, the US-based region has maximum data transfer allocations. Once you choose the region, you have to pick an instance image.
You can opt for OS only or Apps + OS image. This is like installing the software on your computer. Select Apps + OS and select WordPress from the application list.
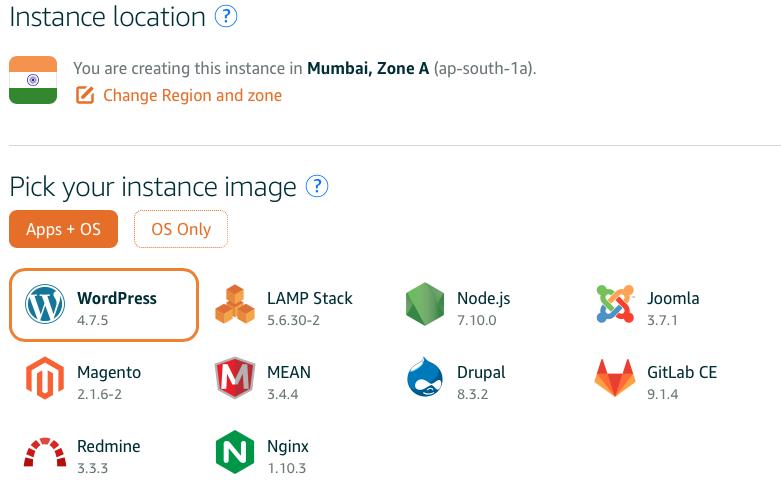
There are some other applications supported on the LightSail instance but we will only talk about WordPress.
Once the app selection is done, you need to select the plan which you want to take for the instance. $5 plans are good for the people who are just starting a blog.
Otherwise, choose based on your need but remember all of them have SSD based storage so response time is usually fine.
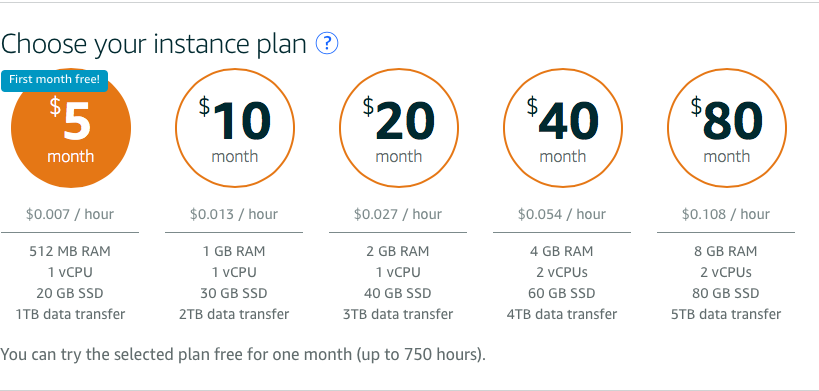
I would recommend you to choose based on the traffic you are expecting. The upgrade process is simple so you can transition to a higher plan later on.
Now name your instance, give it some meaningful name so that you can recognize that instance. Click on Create and you have a virtual server installed with OS and WordPress.
It might take a minute to provision your server. Once it is available, you will have a sample WordPress site running server available to you.
Change Default User
Once the instance is ready it will give you a public IP address. If you go to that public IP Address, you will see a sample WordPress site running.
You will need a user-id and password for WordPress admin login. The default user-id is “user”.
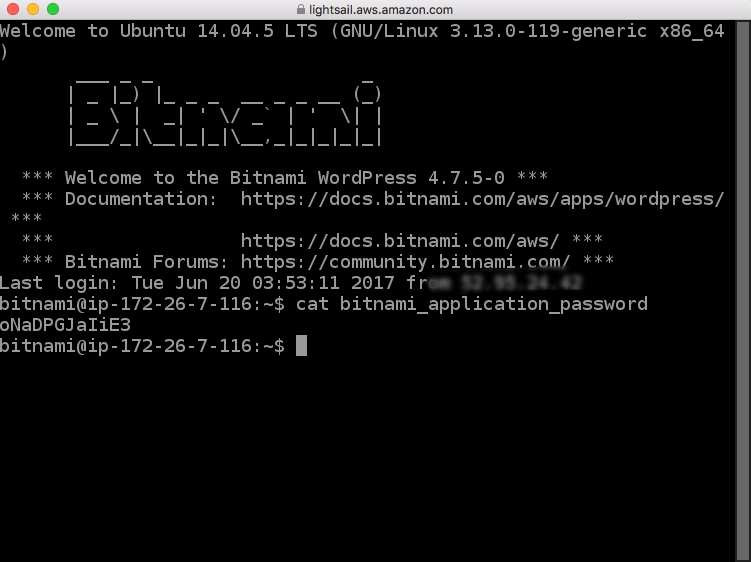
You will see a button connect using SSH on the LightSail panel. If you click on that it will open an SSH session.
Enter the below command to get the password for the admin account.
It will display the password which you can copy and use it to log in to WordPress admin dashboard.
I would suggest creating another user with administrative privileges. Once you have created a new user, login with that user id and delete the default account.
Remove Bitnami Logo
There is a Bitnami logo which will be displayed in the bottom-right corner. You can enter the below command to remove that logo from the website.
You can browse the site to check the logo. If it’s still there you need to restart the webserver. You can use the below-mentioned command to restart the webserver.
With this, your WordPress account is set up and currently running on a public IP and can be accessed using that IP address.
Enable Static IP Address
The next step is to enable a static IP address for your WordPress site. There are other ways to make it available to the world but the Static IP address is better in the longer run.
Later-on if you want to upgrade the server, you just need to create a new instance and assign it to the same static IP address. That will take care of the server upgrade.
You will get a button to create a static IP on your LightSail resource panel. Once you click on that it will create a static public IP address and asked you to assign it to an instance.
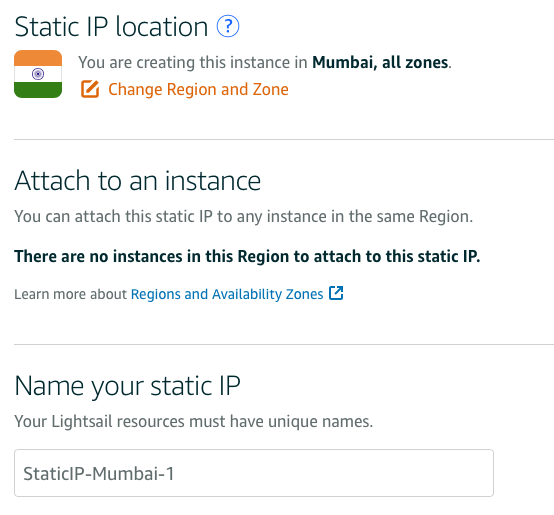
You can assign it to the instance created for a WordPress installation.
Remember, a Static public IP address with a LightSail account is free as long as they are in use. So you have to assign them to an instance, otherwise, there will be a charge for them.
Setup DNS
Now you have a WordPress installation running with a Static IP address. Now its time to tie that IP address to your website name.
There are two ways you can do it and it depends on where you have purchased the domain name.
You also get DNS service from AWS free with your LightSail account. If you decide to use that, you need to set the nameservers with your domain provider. This way AWS will do the name resolution for your website and you will use the AWS infrastructure for that also.
If you want to use LightSail DNS service, you need to create a DNS zone and add the DNS entries in that zone. You will get some nameservers for your DNS zone, which needs to be added to your domain provider as nameservers.
The other way is to keep using the services of your domain provider and update the A type record to point to a static public IP address. That way name resolution will happen with your domain provider and it will be transferred to your installation.
It’s all about the preference as you would not see much difference between both ways. The difference will be in some milli-seconds, so choose according to your choice.
Setup Site URL
The site URL will be set dynamically on AWS Lightsail. So once your DNS names are set up correctly, it should reflect in the WordPress Admin interface as your site URL.
But it can happen that it shows the site URL with www prefix and you would want it to display without that. In those cases you can edit the wp-config.php located at opt/bitnami/apps/wordpress/htdocs/wp-config.php
Look for the below section in that file:
You need to change these lines to point to the URL rather than host name.
You need to replace DomainName to your domain name which you want to use.
You can download the file through FTP, edit and upload it back or use the SSH shell to edit the file.
If the name doesn’t pick up then you need to restart the server. You can use the below command to restart your server in the ssh terminal.
Enable HTTP2 Protocol
Bitnami WordPress image comes with HTTP1 protocol enabled by default but most of the browsers as of today support the new HTTP2 protocol. HTTP2 protocol can make your site loading faster because of parallel downloads on the single connection.
You should always enable the HTTP2 support while installing WordPress on the AWS LightSail. Apache server bundled with Bitnami image comes with HTTP2 support, it’s just not enabled.
To Enable the support you need to edit the file – /opt/bitnami/apache2/conf/httpd.conf
Just open the file and search for http2 in the file. You should get the below line which needs to be updated.
Just remove the ‘#’ from the start of the line to enable the http2 module for apache. After the edit, it should look like below line –
Once done, update the file on the server to enable the http2 support enabled.
Enable Support For WordPress
Now the module is active and we just need to tell our server to use it while serving our WordPress site. That can be done by editing /opt/bitnami/apache2/conf/bitnami/bitnami.conf
By default, the file comes with owner permission of root and you won’t be able to edit it with the SFTP access of Bitnami. Please use the below command to change the ownership of the file before editing it.
Now go ahead and edit the file to include the below line for every VirtualHost in the file. You can search for </VirtualHost> tag in the file and enter the below line above that tag.
For a single domain, you need to update it at two places. Once for HTTP port and other is for the HTTPS port. Once done, update the file in the server and restart the apache server with the below command.
Now you have HTTP2 support enabled for the WordPress installed and it will load faster on the modern browsers.
Backup and Restore Service on AWS LightSail
AWS Lightsail comes preconfigured with the backup and restore services and it’s as easy as clicking a button.
Once you are on the instance management panel, you can see a snapshot tab, which is for backup and restores.
You can click on the snapshot, select the instance and create a snapshot. This will create the backup of your complete disk.
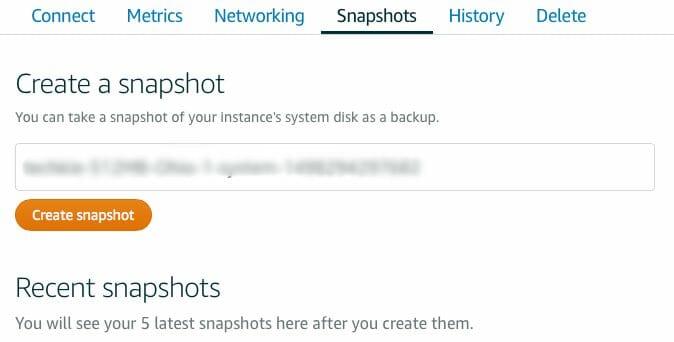
If there is something wrong with your site and you want to restore, you can delete the instance and create a new instance with the snapshot backup. You can update the static IP to point to the new instance.
That’s how easy it is to take a backup and restore the WordPress site on LightSail.
Setup WordPress Emails
The one drawback with the Lightsail account is that it doesn’t come ready with an email server. So your current WordPress installation cannot send an email out.
If you need to have email services you need to set it up. Lightsail WordPress installation comes with pre-installed plugins, one of them is WP Mail SMTP. WP Mail SMTP allows you to work with any SMTP service provider including Gmail accounts.
If you are planning to use a Gmail account then you can also use the Gmail SMTP plugin. Just install the plugin and follow the setup instruction to add a Gmail account.
There are some other methods like installing the mail server on the instance but it will need some understanding of OS and package installation on Ubuntu.
Check this guide to setup and send Emails from your domain name -> Send Emails on AWS LightSail using AWS SES.
Setup SEO PowerSuite
Though we are talking about setting up WordPress on AWS Lightsail, any site will not be successful if you don’t approach it correctly. SEO is one of those efforts and it should become a habit from the start of the blog.
The only problem is that most of the SEO software is costly which is not affordable by new bloggers. SEO PowerSuite changes that with a free version that can do many tasks like Technical SEO audit, Keyword Research, Google Analytics Data Exploration, etc.
This is one of the tools which I always ask to set up and start using it in day to day working. Building good habits is one of the keys to success and this software only adds that for new bloggers. The free version allows the Technical site audit for up to 500 pages which should be good enough at the start.
So I would highly recommend to setup SEO PowerSuite free version and start your SEO journey. If you have some budget, the Professional version should be good enough for most of the webmasters.
Conclusion
You can use the Lightsail Metrics tab to monitor the CPU, data bandwidth, and memory usage. You can check and optimize your installation accordingly.
Lightsail also provides constant monitoring for your WordPress installation, you can check the status check messages on the metrics section also.
I hope with the help of this tutorial you should be able to install fully function WordPress on the AWS LightSail.




Hi,
I created a wordpress image as my first instance on lightsail, I had started with a static ip & then configuring the DNS my site was up and only thing i could not do was install a SSL – using the letsencrypt WP-Encrypt Plugin .
Tried 10’s of things to get it work, but with no luck , finally i deleted the entire instance and the static ip and started again from scratch this time i started without adding a static IP
And within minutes i could install the SSL using the same plugin!
I wish to know can i still get a Static IP on the same instance without breaking the website, as currently I am on the 5$ plan i wish to definitely upgrade the same and wish to stay open for Scaling up in future with lightsail
Also can you put some light on static IP what if I don’t use the same and can i now attach it without any issues to the running instance
Thanks in advance
Hi Rahul,
Static IP help in hiding all the internal work from the world. You can just change the instanse and attach it to same Static IP, you don’t need to wait for the DNS propogations. Even if you have setup the instance, you can still create a Static IP and attach it to instance. Change the DNS and wait for it to propogate.
Not sure what error you were facing, but you can attach the Static IP even after applying the SSL. You can follow the below guide for applying SSL on LightSail.
Let me know if you are facing any specific issue and I will try to help.
– Sanjeev
Thanks applying this would create a snapshot as well for being on a safer side, also I am using Cloudflare that I hope shall see the changes automatically, one last thing “ static ip helps in hiding the internal work from world” could you explain this please ?
What I mean from Internal work is Updating Themes, Bitnami Stack etc. You want to do any major design changes or any other work on your blog, you can create another instance.
Make changes in that instance using Public IP of that instance, once everything is done and you are satisfied, just attach the Static IP to your new instance and within minutes your changes will be reflected.
This helps a lot in making sure your blog is running smoothly while you are testing your changes. If you use Public IP of a instance, you need to change the DNS and wait for 48 hours to get it propagated.
– Sanjeev
Good tutorial, thank you.
For me what’s missing is a way to do multisite WP (ie. multiple instances of WP running on the lightsail host), and apparently Bitnami is far from easy to configure in this mode.
Many other hosting companies offer super simple tool to make this happen and link with any domain name you might have. LightSail is indeed powerful, but their implementation of WP is too simplistic for now.
Hi Chris,
Though theoretically it is possible to host multiple site on LightSail but it’s not as easy as clicking on cPanel and create a new install. You need to do some manual work and make sure both sites are served properly.
This is one place where they can improve or we may have to create a script to add a new site by automating all the work.
– Sanjeev
HI Sanjeev, thanks for the detailed instructions! I have followed all your precise notes and finally was able to direct all traffic to https.
But I am still left with both https://www.domain.com and https://domain.com
I tried the CNAME to redirect http://www.domain.com to domain.com..
did not work.. googled a few places and found an instruction to add the following to httpd-app.conf
# Rewrite www to non-wwwRewriteCond %{HTTP_HOST} ^www\.(.*)$ [NC]
RewriteRule ^(.*)$ http://%1/$1 [R=301,L]
This did not work too. I am still seeing both www and non-www.
Any idea why the CNAME on lightsail does not work in redirecting www to non-www?
somehow managed to get it to work without the CNAME but have both ‘@.domain.com’ and ‘www.domain.com’ A records to the static ip, together with the above edit in httpd-app.conf
Hi Jared,
Not sure why the CNAME has not worked. Usually setting A records with the same IP and CNAME to different name should have the same impact.
CNAME should take care of www domain name to non-www domain name transfer. httpd-add.conf should take care of http to https transfer. Both together will give the desired result. I hope you are not adding http prefix in the CNAME record. It should only have www and non-www domain name.
– Sanjeev
Thanks for the attention Sanjeev. I did not add the http prefix in the CNAME. In the past I had used CNAME on my GoDaddy DNS for another site and it worked. But now doing this on Lightsail seems a tab bit more complicated lol
Not sure why it is not giving the desired result. Your www and non-www should point to the same install, A records will also do the that. As long as it’s working fine now, you are all set.
– Sanjeev